How to Make a String Puppet {Polymer Clay Tutorial}

Each Christmas, I try to give my kids at least one handmade DIY gift. One year, I sewed a pretend campfire set. This year, I learned how to make a string puppet with polymer clay, and I’m sharing my full tutorial below!
This isn’t just any string puppet. It has a special meaning based on my favorite Christmas movie of ALL TIME…It’s a Wonderful Life!

This post includes affiliate links, and I will be compensated if you make a purchase after clicking on my links. See my disclosures for details.
My string puppet craft is part of the 25 Days of Christmas Movie Blog Hop. Read on for details about our hosts and a chance to win some cold, hard cash!
The Puppet Inspiration: It’s a Wonderful Life
My family watches It’s a Wonderful Life nearly every Christmas. You’d think it would get old. But it doesn’t!
Nothing warms my heart more than the story of George Bailey learning to appreciate his life with the help of his guardian angel, Clarence Odbody.
(Did you know Odbody is his last name, by the way?)
My favorite line from the movie is when Zuzu says, “Look, Daddy! Teacher says, every time a bell rings, an angel gets his wings!”
To help Clarence Odbody earn his wings, I designed a string puppet with a bell and “wings” that open when you pull the string. Yes, it was a lofty craft goal, but I promise it’s not as absurd as it sounds!
Notes on String Puppet Tutorial

Before walking through the step-by-step tutorial, here are a few notes to consider:
- To clay or not to clay: I used polymer clay for this tutorial, but you can substitute thick cardboard.
- If you choose to clay: Allow time for baking and glazing. Polymer clay needs to bake for about 20-25 minutes, and the glaze takes around 30 minutes to dry.
Cardboard string puppet version: Follow roughly the same steps as below, ensuring the cardboard legs and wings have room to move. Then, you or the kids can paint the cardboard puppet in any color desired!
String Puppet Supplies
To make a string puppet, you’ll need just a few items that you can easily buy on Amazon (links below) or a local hobby store.
- Polymer clay (4 oz. for body/legs, 2 oz. for wings) or thick cardboard
- Finishing glaze (optional)
- Clay sculpting tools (optional)
- Jingle bells
- Colored string
- Scrapbook screw posts and extension posts
Free String Puppet Download
First, download the pattern for this string puppet, or create your own design.
Download (.pdf): Clarence Odbody String Puppet Pattern
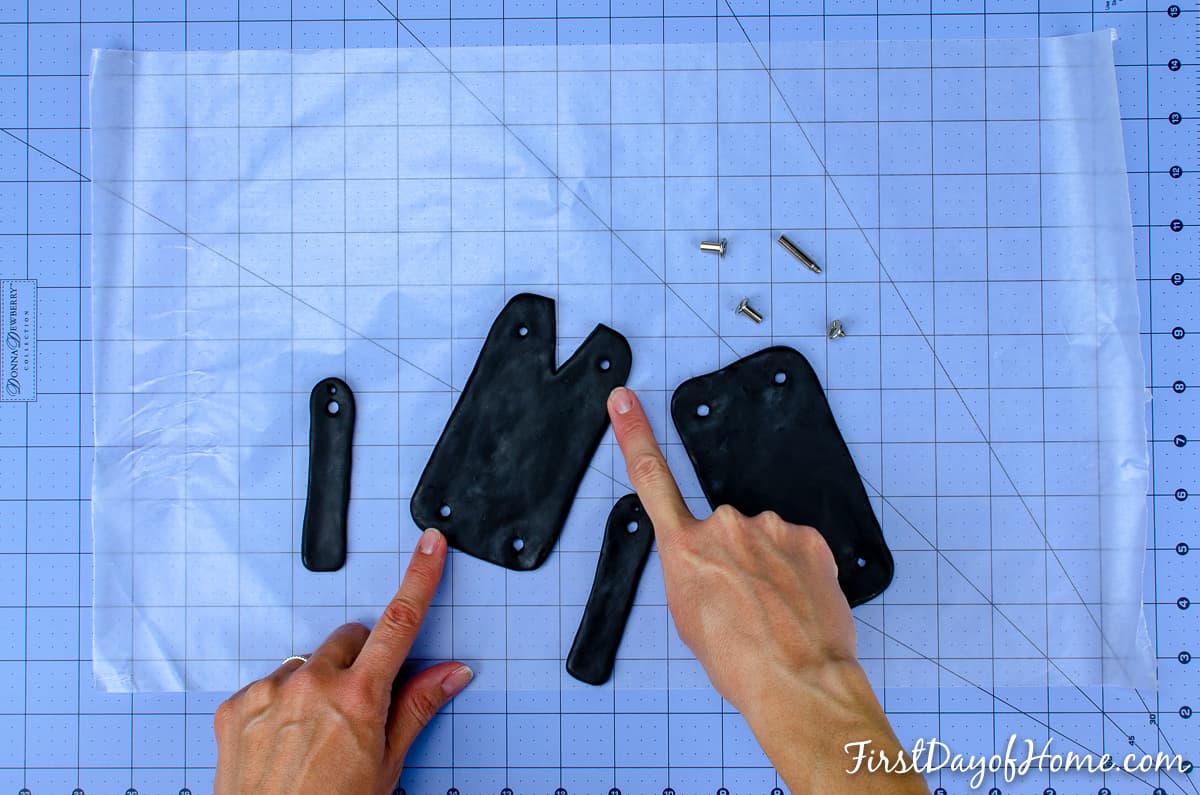
Directions – String Puppet Torso, Legs & Head
1. Mold clay into the torso and legs
- Knead the clay for a few minutes to soften it. Then, mold it according to the torso and leg shapes in the pattern.
- Flatten each shape to about 1/8-inch thickness.
- Create holes for both the screws and strings, as shown in the pattern.
2. Cut a wedge in one torso piece and create the head
- If desired, cut a wedge in one torso piece to add a white shirt and bow tie for Clarence. (He was an Angel Second Class, after all!)
- Attach the head to the shirt or torso.
- I suggest baking the head and torso pieces together rather than gluing them later.
- You can also add your bow tie (optional) before baking.
Note: Darker colored clay will sometimes leave residue on your hands. I recommend thoroughly washing before switching to another color.

3. Make sure screws will easily fit into each hole; then bake
- If you don’t leave plenty of “wiggle room” for the screw posts, your joints won’t move smoothly. Keep in mind, you may need extension posts depending on the thickness of your string puppet.
- Bake the clay according to the directions on your package. Typically, 20-25 minutes at the assigned temperature does the trick.

Directions – String Puppet Wings & Head

- Form two equally sized balls of white polymer clay to shape the wings.
- Use the downloaded pattern to mold your clay into wing shapes.
- Create holes in the wings that line up with the torso.
- “Feather” the wings with a sculpting tool or knife.
- Bake all pieces according to the clay manufacturer’s directions.
Directions – Glaze & Assembly

Glaze
If you decide to use a polymer clay glaze on your string puppet, wait about 30 minutes for the glaze to harden. You can apply glaze with a simple craft paint brush.
Assembly
Insert the screw posts through the back torso. Then, add string into each wing/leg, make a knot facing the back of the puppet, and place the limbs on the posts.
Cut the length of string so all pieces are even when the string puppet is “at rest.” Then, tie all four strings in a knot about 2 inches below the base of the torso.

The final assembly involves attaching the top screws and adding a bell to your string below the knot.

Now you’re ready to quote It’s a Wonderful Life: “Every time a bell rings, an angel gets his wings!”

As Clarence Odbody writes in It’s a Wonderful Life, “Remember, no man is a failure who has friends.” On that note…meet some of my friends!
Welcome to the 25 Days of Christmas Movies Blog Hop!
We have 24 talented bloggers gathered together to share with you all the wonderful crafts and recipes you can make this Christmas season, based on some of the most beloved holiday films. There are 24 films to be inspired by for your holiday season, and 24 talented bloggers to aid your inspiration! If you love Christmas movies, you have come to the right place!
Let’s Meet The Hosts!
Megan ~ C’mon Get Crafty
Marie ~ The Inspiration Vault
Carmen ~ Gross to Grandiose
Christine ~ My Kitchen My Craft
Crissy ~ First Day of Home
Emily ~ Domestic Deadline
Stephanie ~ The Tip Toe Fairy
Rebecca ~ The Moments at Home
Marianne ~ Songbird
Ashley ~ Attempts at Domestication
Sue ~ A Purdy Little House
Roseann ~ This Autoimmune Life
Kim ~ Kimspireddiy
Jaime ~ Love Jaime
Terri ~ Christmas Tree Lane
Lyne ~ The Paper Addict
Nicole ~ For the Love of Food
Marie ~ DIY Adulation
Lara~ Love on a Plate
Jaclyn ~ The Dotted Nest
This is so cool! I can’t believe it was a DIY! You’ve got skills!
Thanks, Ashley! That’s so sweet. 😊 I was relieved it actually worked!
This is an impressive craft! Yet your directions make it look so easy! Pinning!
Thanks so much, Roseann! I loved your angel ornament, too. It was such a brilliant craft!
Very sweet puppet! It’s a wonderful life is my husband’s favorite Christmas movie.
Thanks, Lauren! Yes, gotta love that movie!