Easy Christmas Shadow Boxes to Make in a Day
Looking for the perfect Christmas gift for friends and family? These Christmas shadow boxes look professional enough to give as gifts but take only minutes to make. You might even want to keep them for yourself!

This post contains affiliate links, and I will be compensated if you make a purchase after clicking on my links. For more information, please see my disclosures.
How to Make Christmas Shadow Boxes: 3 Variations
I stumbled upon a wonderful hack when I began crafting with my little shadow box. I always like to stock up on Christmas scrapbook paper pads because I know they can be used for gift tags, cards, and other DIY projects. Here’s the secret, though.
One of the 12 x 12-inch sheets was divided into four designs that fit PERFECTLY in my shadow box! In the Supplies section, I’ll link to the shadow boxes I used and some paper bundles that should have similar layouts.
I ended up creating three different designs, from easy to intermediate. I’m even including a
Supplies

- Shadow box
- Scrapbook paper pad (12 x 12 inches), OR
- Mini scrapbook paper pad (6 x 6 inches)
- Mini bottlebrush trees
- Double-sided tape (for bottlebrush trees)
- Faux snow
- Diamond dust glitter (optional)
- Cricut permanent vinyl or removable vinyl (for decal only)
Simple Christmas Shadow Box (3 Minutes)
This simple hack is a great way to make DIY gifts in a jiffy. All you need is scrapbook paper and a good pair of scissors or a paper cutter.
This 12 x 12-inch paper pad has a sheet with four divided designs. The quality is amazing because it even has gold foil lettering. I went with this “Joy to the World” artwork, but there were several others I could have chosen.

It was just a matter of cutting out my square and popping it into my shadow box frame. What a perfect fit! I debated adding other 3D elements like faux berries or greenery, but I like the simplicity of this design.
3D Christmas Shadow Box (10 Minutes)
For a little something extra, I made this 3D festive shadow box. First, I trimmed a sheet of plaid scrapbook paper into a 6 x 6-inch square and added a wooden phrase that reads “believe.”
The Christmas phrases were another Target Dollar Spot find last year. If you own a laser cutting machine like the xTool M1, you could easily make your cutouts with basswood at home. You can also buy similar word cutouts here.
I used my favorite gold paint to add a metallic sheen to the wood cutout. It took about 3 coats, but it was worth it.

The wood cutout had a sticky backing, so it was easy to adhere to the paper. I then added two small bottlebrush trees to the base using double-sided tape. (You can also use a hot glue gun if you prefer.) Funny enough, the metallic base on the bottle brush tree matched my gold lettering perfectly.
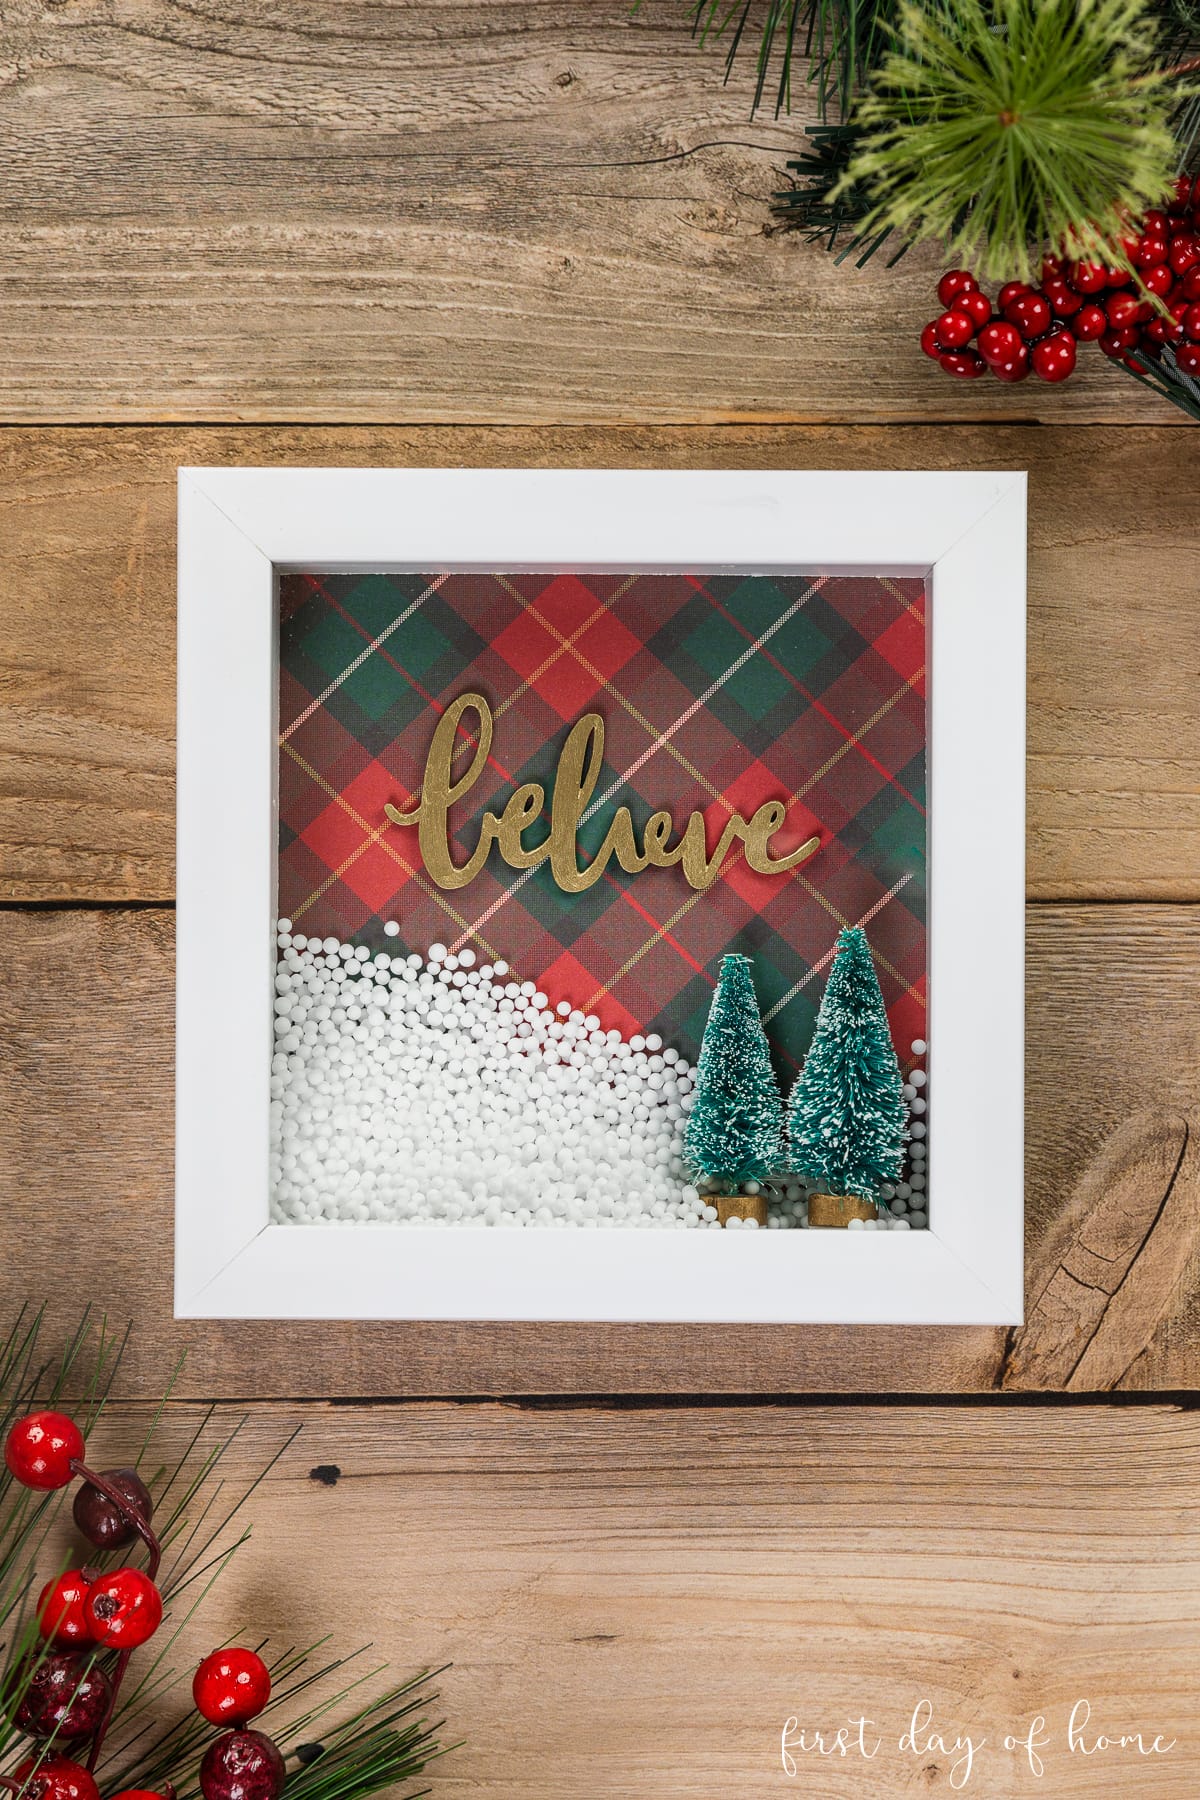
The final step was adding faux snow that I picked up at Dollar Tree. You simply pour a small amount filling about 1/4 of the shadow box, then add the back panel of the shadow box.
Cricut Christmas Shadow Box (20 Minutes)
The final shadow box involves a bit of Cricut crafting. Start by selecting a blue paper background for the shadow box. I found the perfect mini paper pad with 6 x 6-inch sheets. It had a great mix of blues with speckles that reminded me of snow.
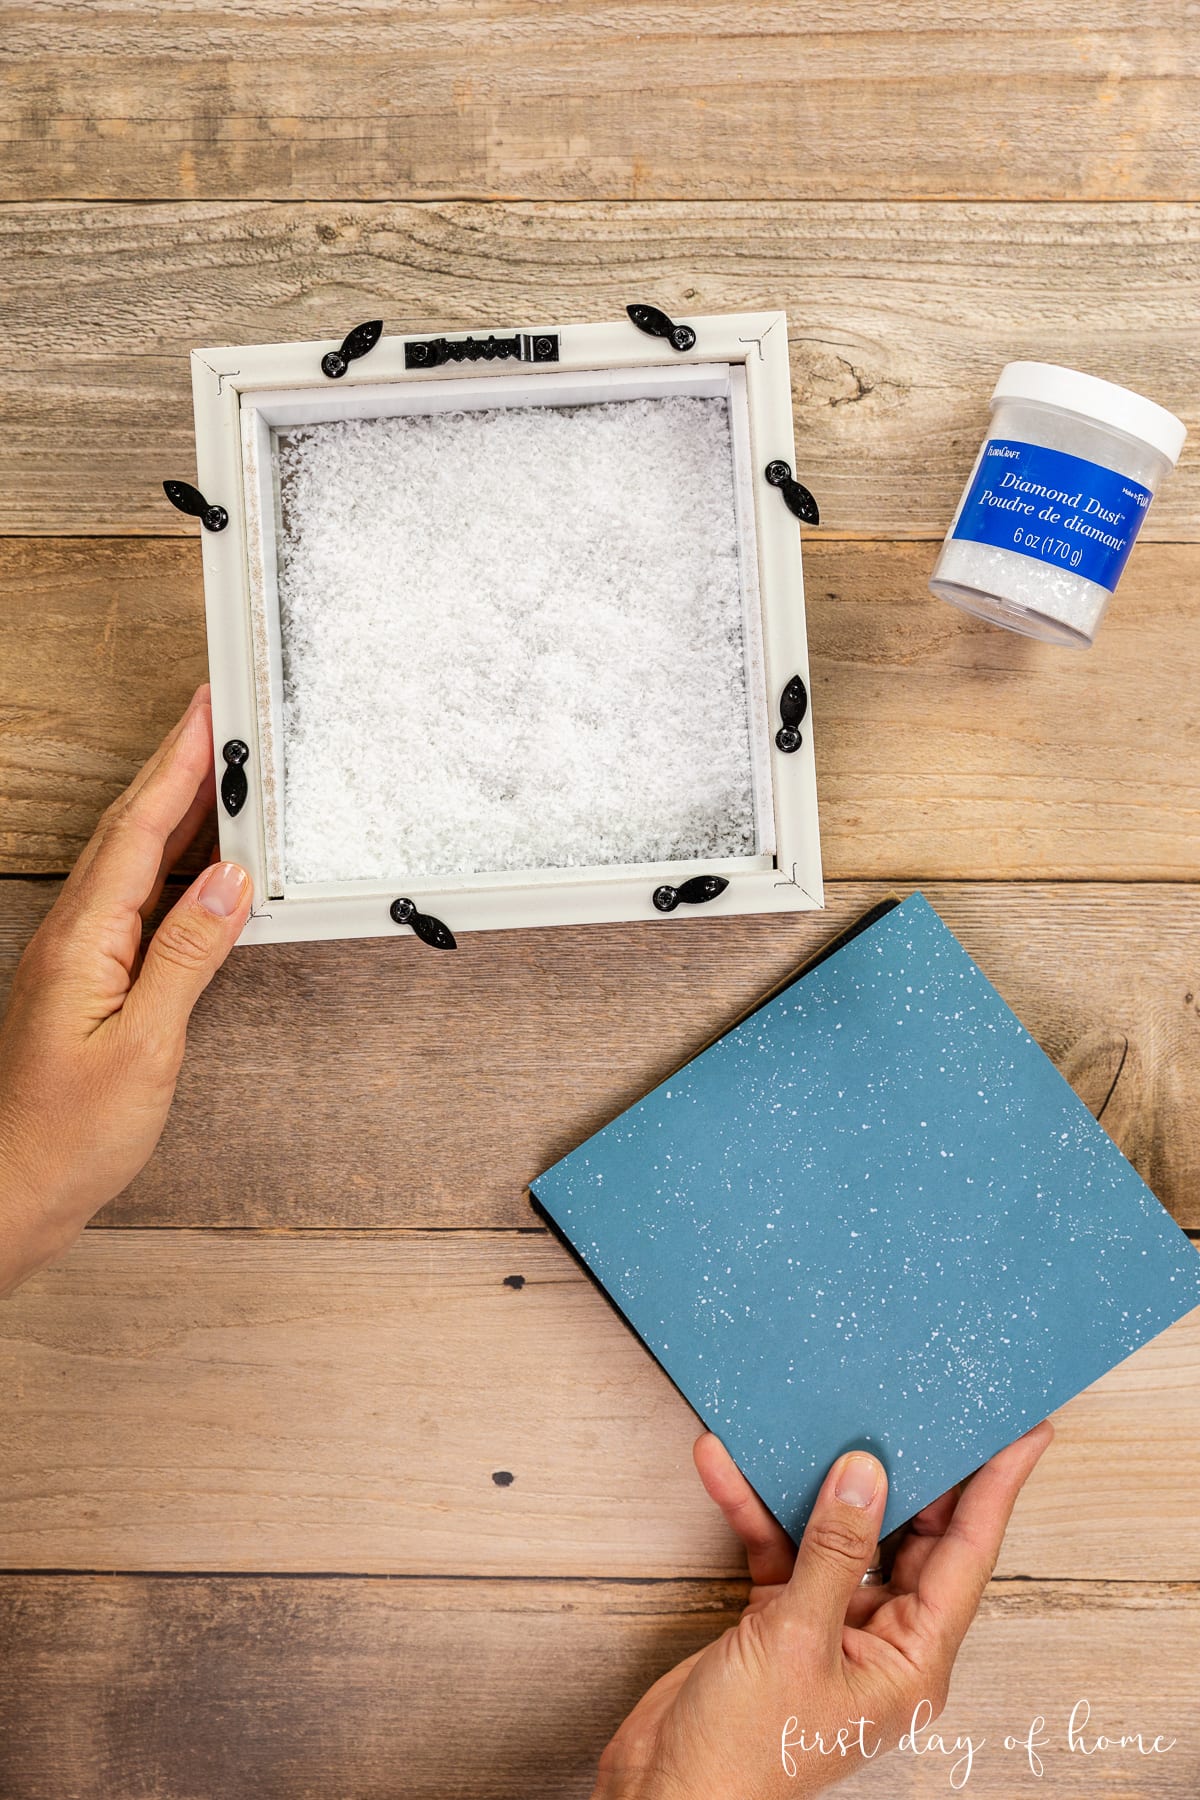
I filled the shadow box about 30% full of fake snow mixed with diamond dust glitter to give the effect of snowflakes. You can also buy this iridescent snow if you want more sparkle in your shadow box.
After closing the shadow box, you can make a decal using your Cricut machine. I went with the phrase “Let it Snow,” which you can buy as part of my Christmas SVG bundle.
When you size your design in


First, upload the SVG files and cut the design on permanent or removable vinyl. Then, begin weeding the excess vinyl and use transfer tape to pick up the design. Finally, transfer the decal to the shadowbox frame.
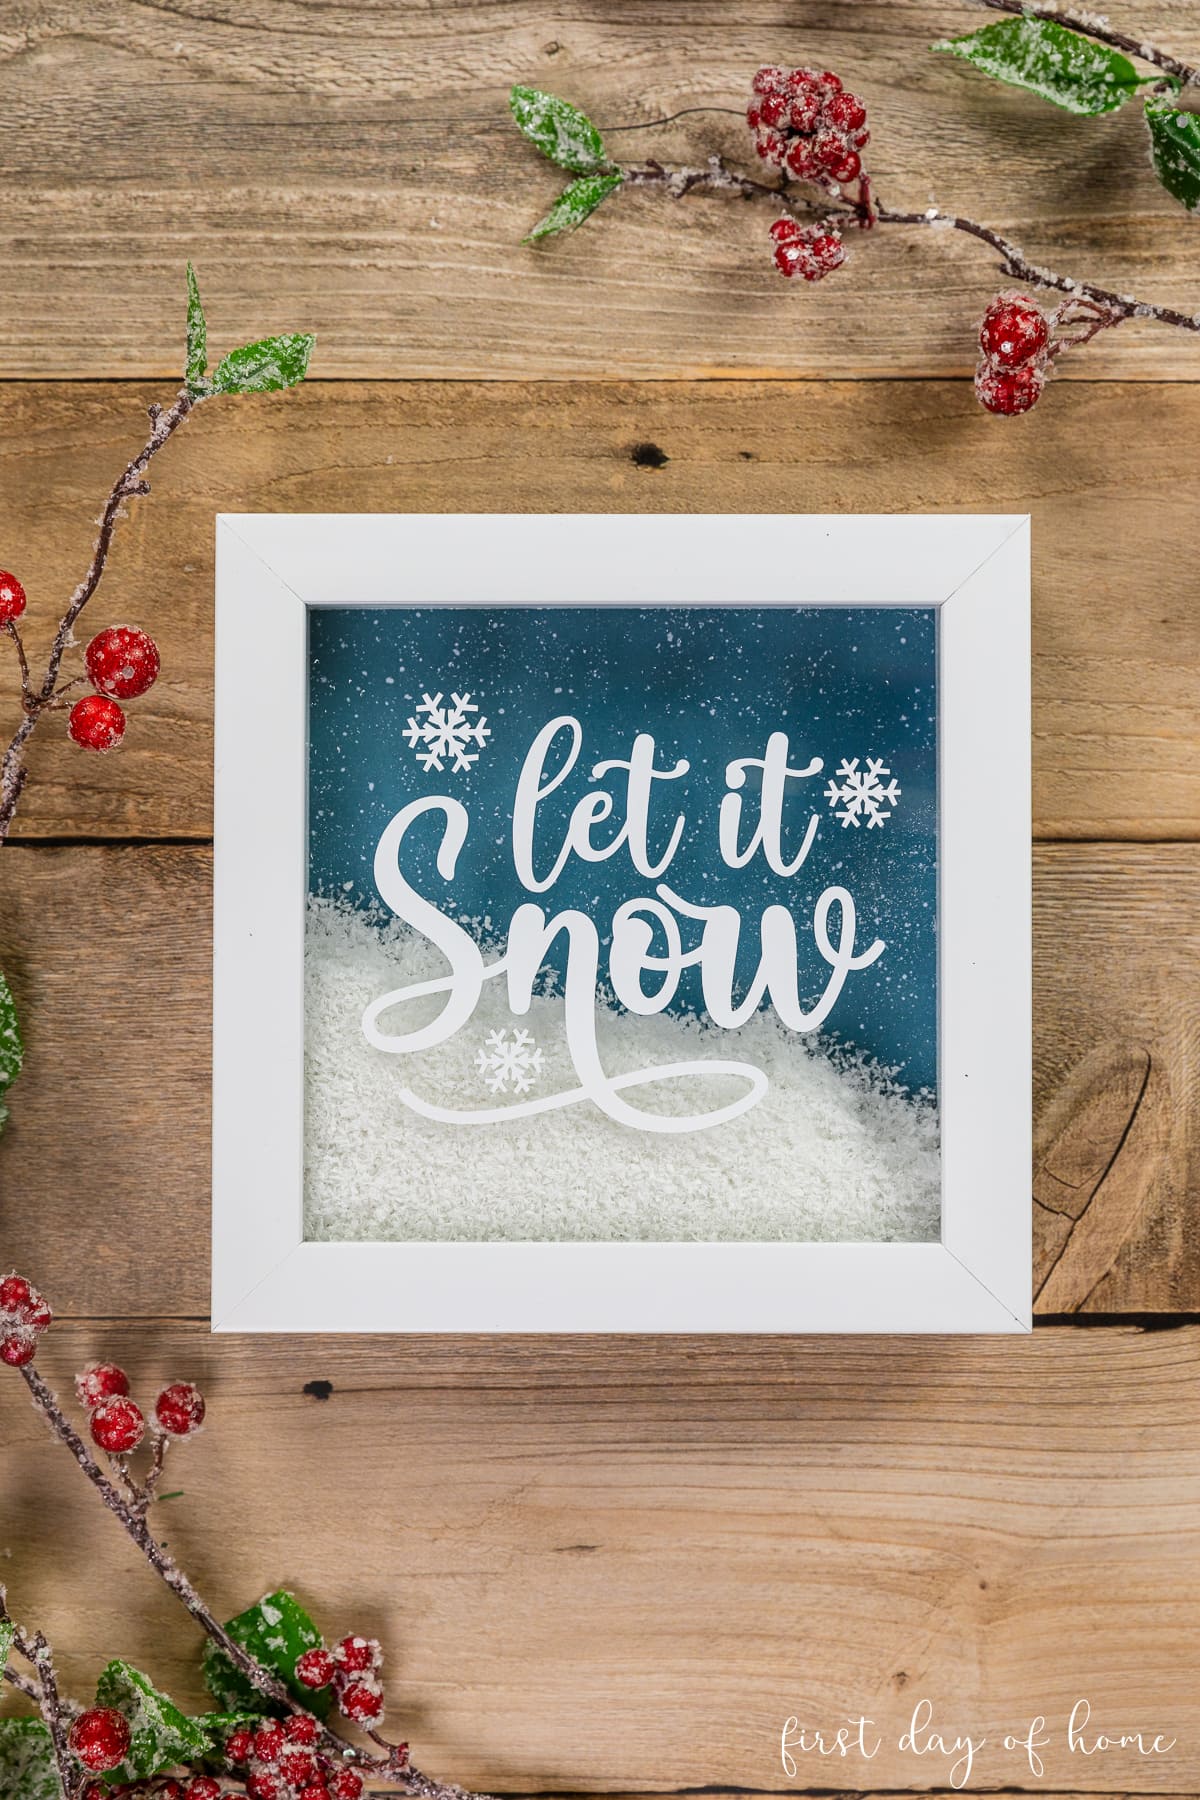
I love this sweet Christmas shadow box and can’t wait to display it around the house for the holidays. My boys love shaking it like a snow globe, so I’m glad I didn’t put something breakable inside!
More DIY Christmas Shadow Box Ideas

There’s no limit to the variations you can make for Christmas shadow boxes. These three projects used a square shadow box, but you can also try using triangular forms or other shapes. Many people opt to use house shapes to create a nativity scene. I’m putting that on my future project list!
If you’re looking for another quick Christmas craft, be sure the check out these fabric Christmas trees shown above.
Shop the Post

Pin it for later!


