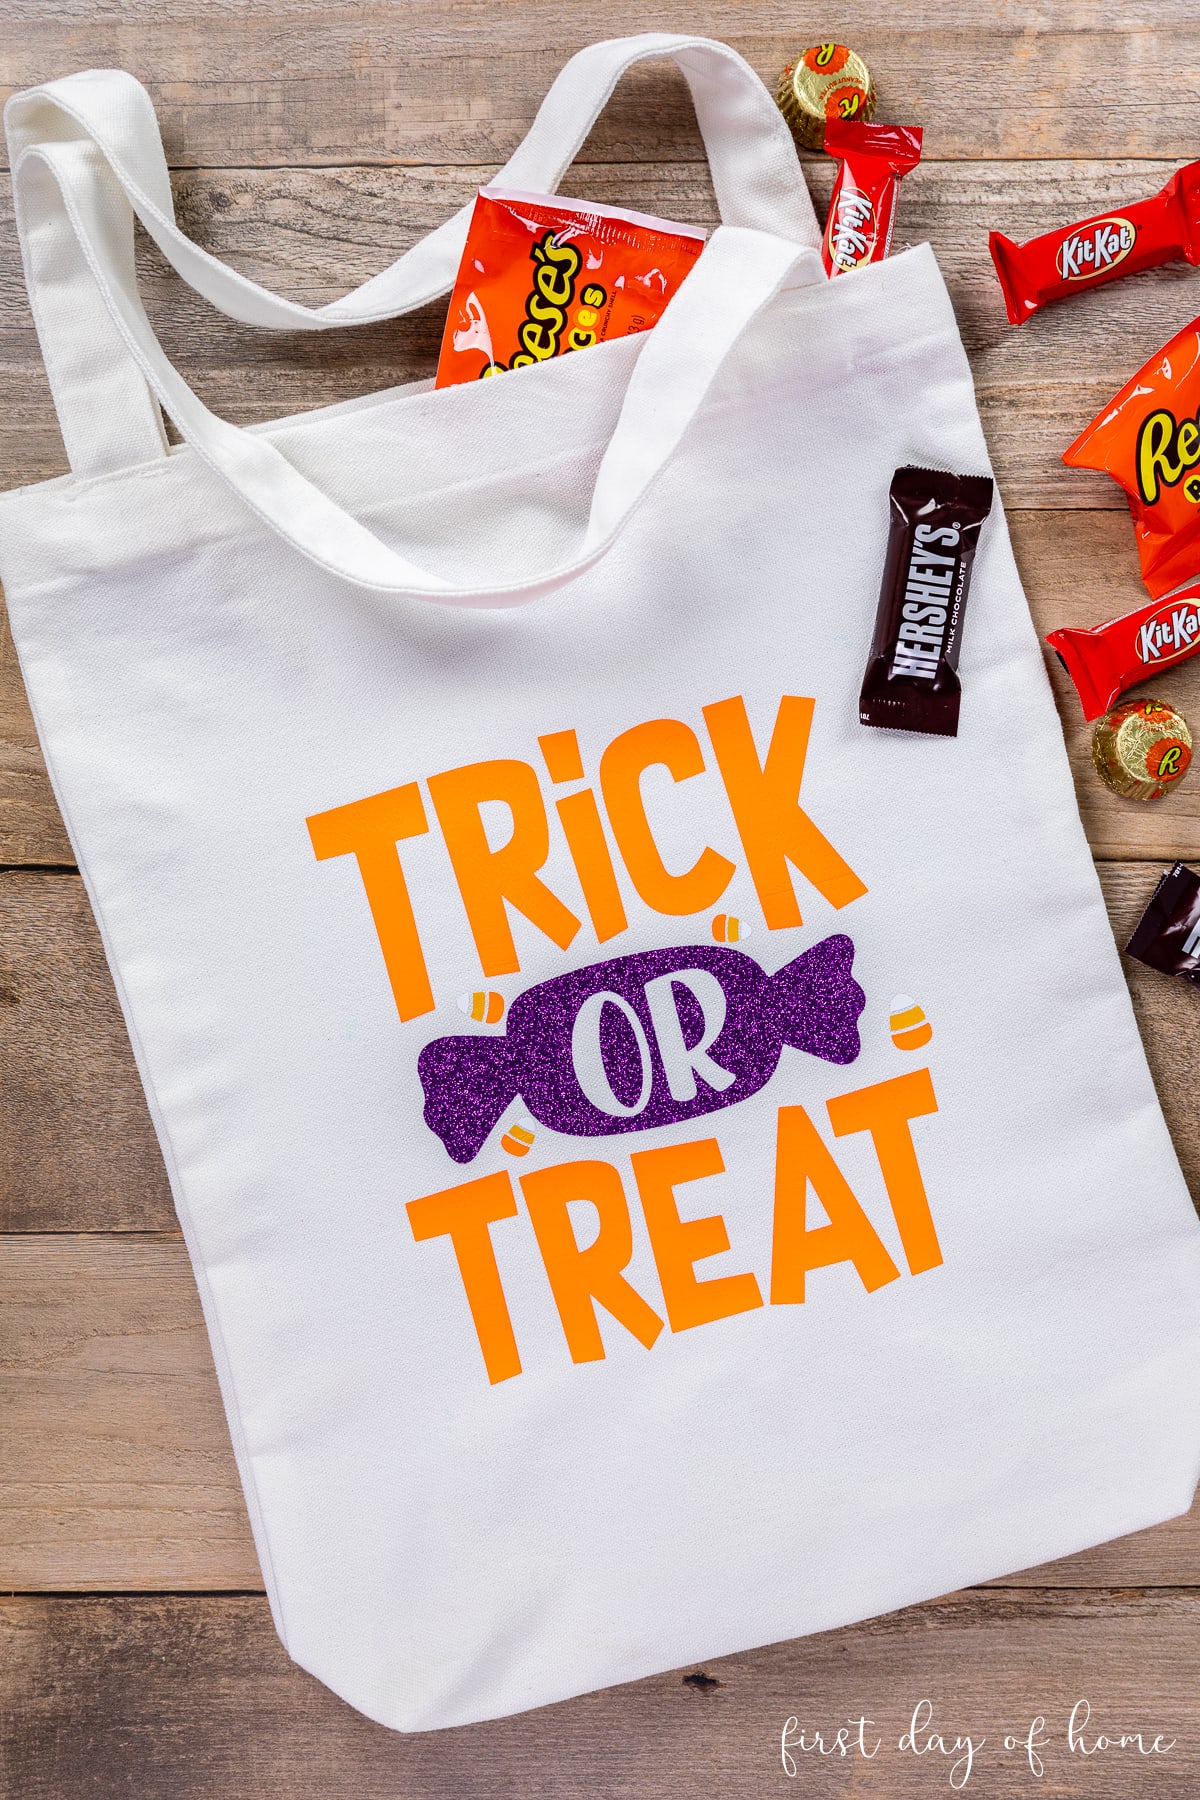
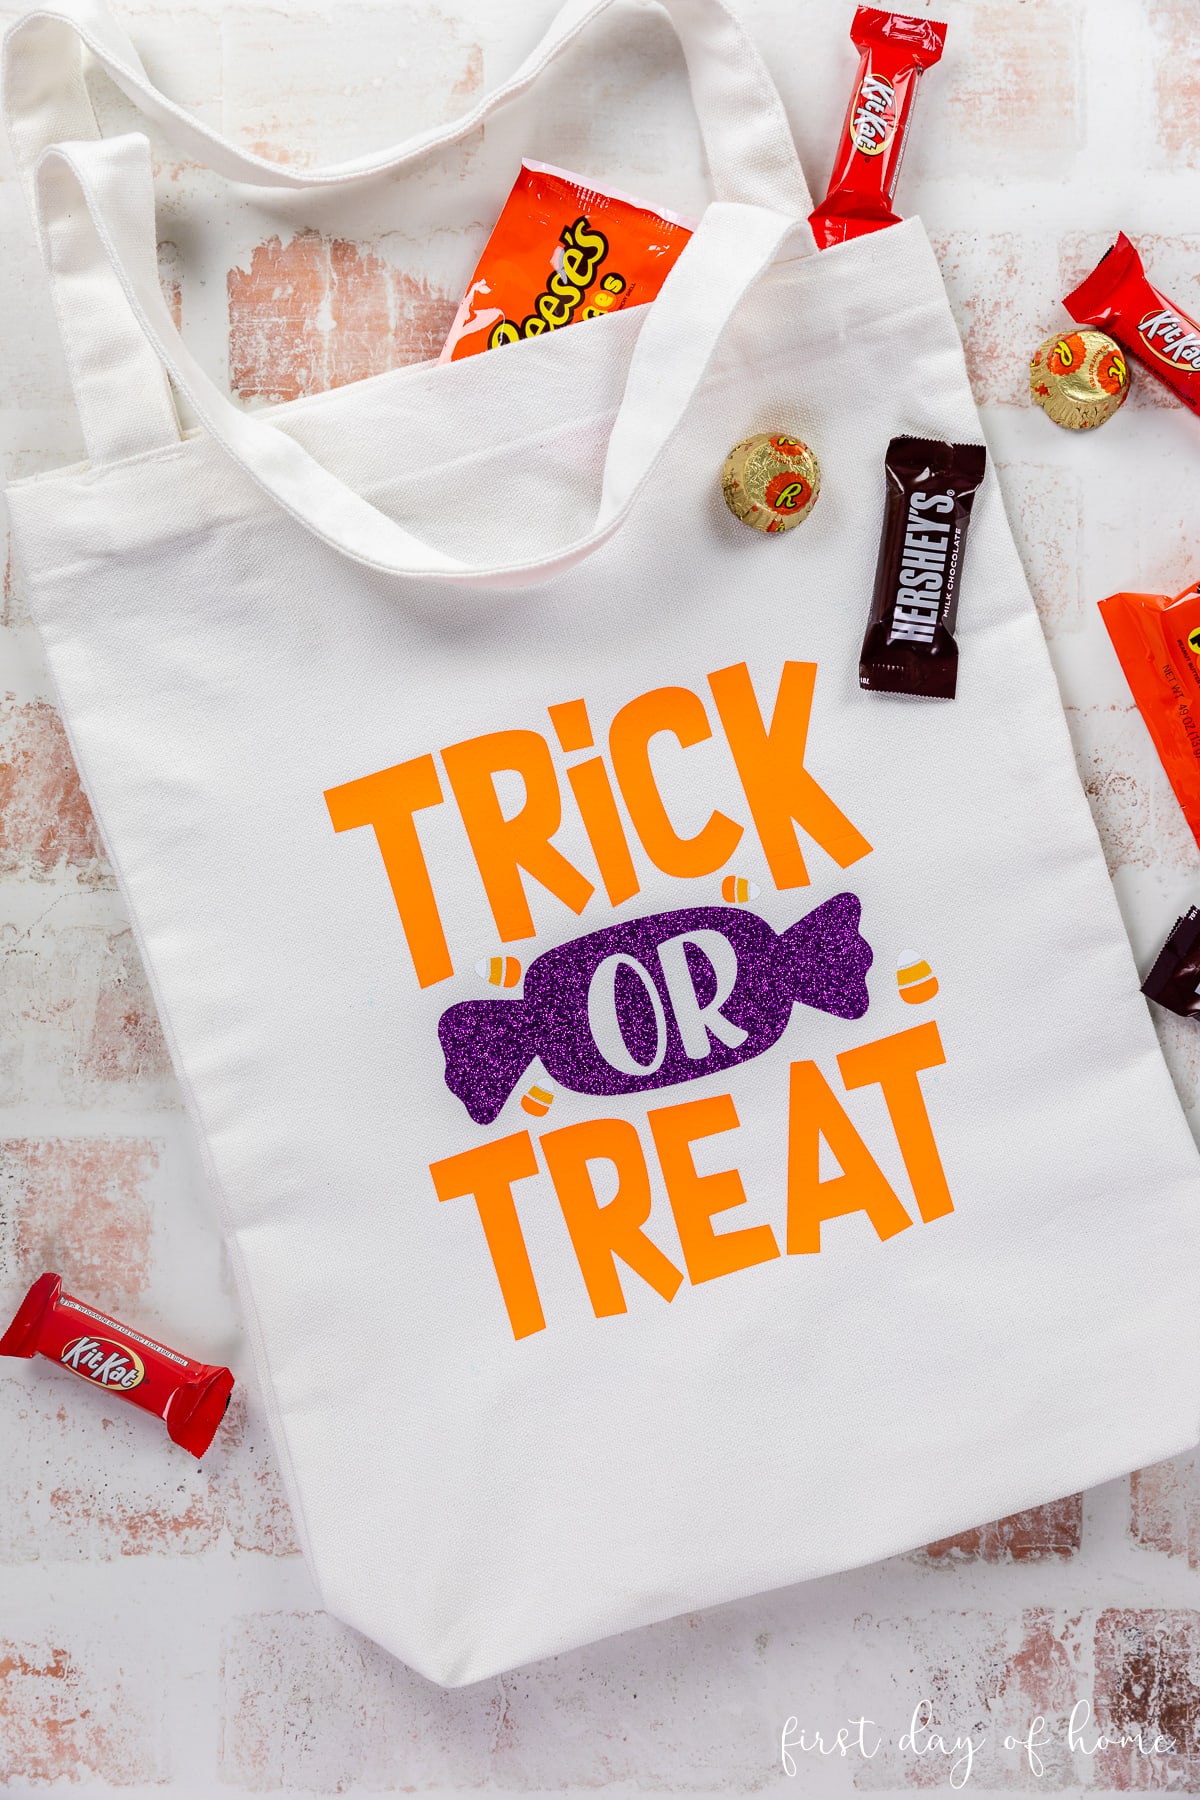
Easy DIY Trick or Treat Bag


When I was a kid, everyone used the same plastic pumpkin bucket to go trick-or-treating. Nowadays, kids want to celebrate Halloween in style with a custom DIY trick or treat bag. Who can blame them? It’s so easy to whip up a cute tote in minutes with Cricut heat transfer vinyl. Let me show you how!
This post contains affiliate links, and I will be compensated if you make a purchase after clicking on my links. For more information, please see my disclosures.
How to Make a DIY Trick or Treat Bag
I’m a sucker for Halloween decorations at the Target Dollar Spot. When I spotted a $3 canvas tote bag with handles, I grabbed it in a hurry because I knew it was destined for a Cricut transformation. When ya know, ya know.
You can customize your DIY treat bag for any costume. (Add glow in the dark vinyl for a fun Halloween trick.) This is a great craft to upcycle an old tote bag too!
In my digital design shop, I have many great Halloween SVG files. I’ve had my heart set on demonstrating a tote bag with my “Trick or Treat” file in particular. You can get this file, along with a bundle of other great Halloween SVGs, down below.
Fall Graphics Bundle
If you’re looking for more designs for your fall crafting, check out these digital downloads in my new store. These are compatible with Cricut, Cameo, and xTool machines.
You’re not limited to using a Cricut machine either. This file will work on a Cameo Silhouette or the new xTool M1 hybrid laser machine. If you’re not familiar with this machine, it can cut with both a laser and a blade. (You would use the blade in this case.) Read my full xTool M1 review for more info.
Supplies

- Canvas tote bag
- Cricut Explore, Cricut Maker, xTool M1, or other cutting machine
- Iron-on vinyl
- Glitter iron-on vinyl
- Teflon sheets (if layering vinyl)
- EasyPress 3 or other heat press
- Cricut EasyPress Mat (recommended)
- Weeding tools
You don’t need to use a combination of Everyday Iron-On and Glitter Iron-On vinyl. I just like the contrast of the textures for this design.
I’ll show you how to layer the various pieces of vinyl whether you’re using only smooth iron-on or a combination of smooth vinyl and glitter vinyl.
Note: While you can use a household iron for heat-transfer vinyl, results may vary since you cannot control the precise temperature for each type of vinyl.
If you prefer to sew your own Halloween treat bag, I have a free pattern for an easy tote with straps. I have video tutorials on making the tote bag with a sewing machine as well as how to stencil designs if you need more treat bag ideas.
Step 1: Arrange and resize the layers in Cricut Design Space
If you’re using my Trick or Treat SVG design, you’ll first need to upload the design in the Cricut Design Space software. To do this, head to your Canvas, and click “Upload” on the left sidebar.
Of course, you can choose any other graphic in Cricut Design Space, especially if you have a Cricut Access subscription.
Attach the layers
When you upload this SVG design into Cricut Design Space, the color layers will come grouped. You’ll want to ungroup the layers so that you can then attach all pieces of the same color.
For instance, I selected the words “trick” and “treat” as well as the orange slices of the candy corns by clicking each layer and holding the Shift key before hitting the Attach button in the lower left corner. This ensures that the design is cut with the same spacing shown in Cricut Design Space
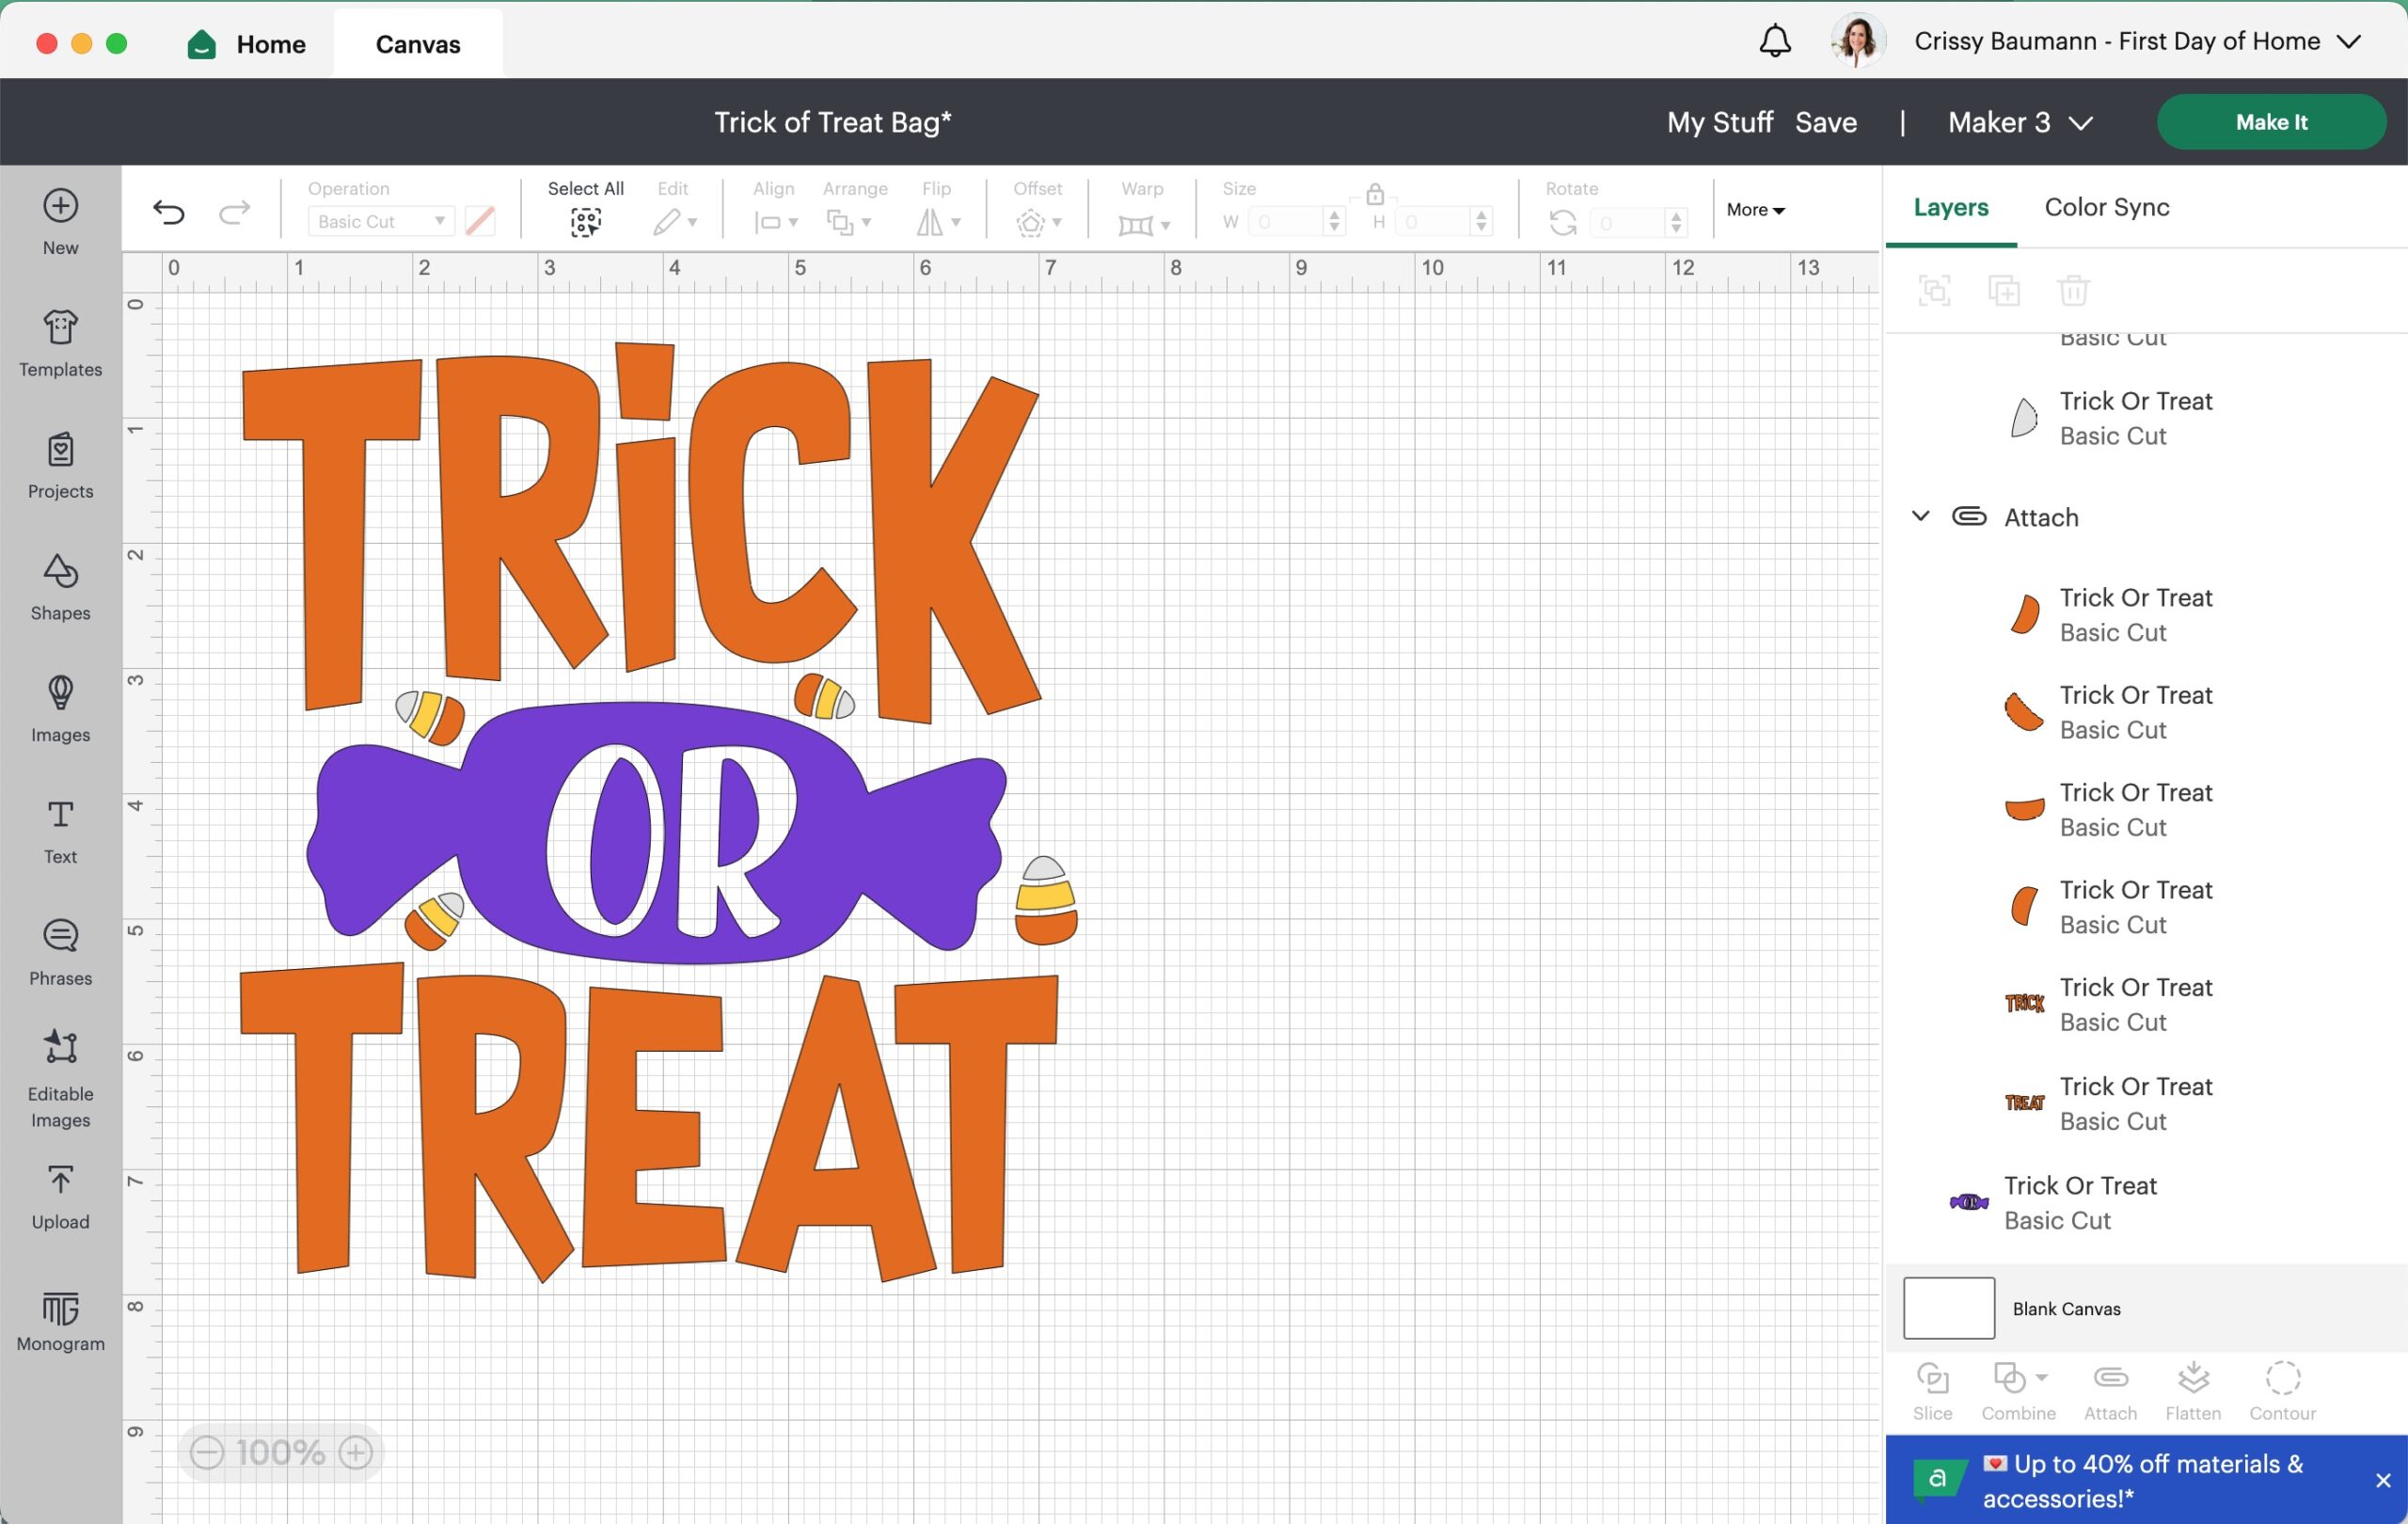
The one drawback of “attaching” pieces this way is that you’ll have some wasted vinyl when the machine cuts the design. However, I think it’s a good tradeoff since it’s easier to line things up when you press your design later.
Size the design
Be sure to measure your tote bag before sizing your image. I wanted to keep my design about 7.5 x 7.5 inches, which was the perfect size based on my canvas bag dimensions. I own a 9×9-inch EasyPress 3, so keeping the design within the measurements of my heat plate was also helpful.
Step 2: Send the file to your Cricut machine
Once you have your design properly attached and sized, it’s time to hit my favorite button: Make It! Turn on your Cricut machine, and prepare your vinyl layers for cutting.
Cutting the vinyl
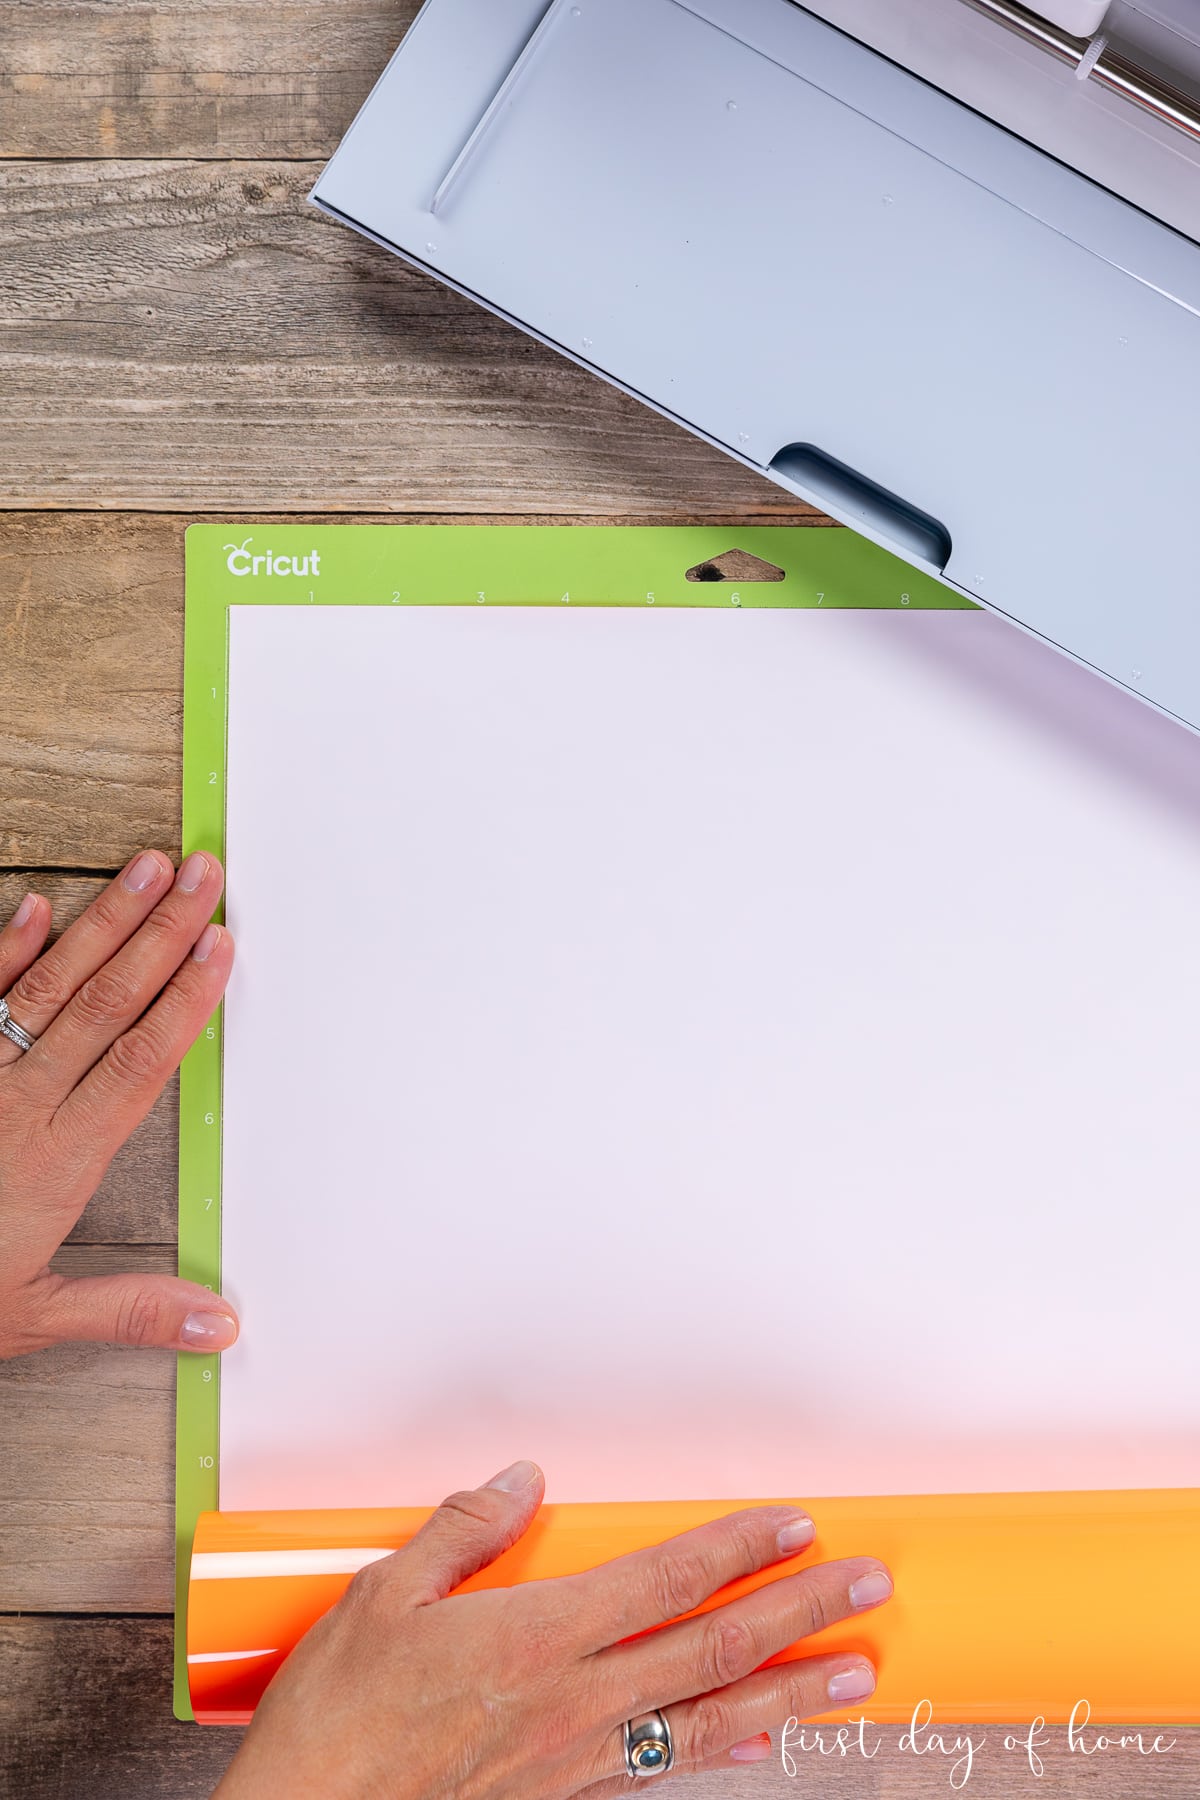
To prepare your heat transfer vinyl (HTV) for cutting, follow this checklist:
- Always mirror your design for iron-on vinyl.
- Choose a standard grip cutting mat unless you’re using Smart Iron-On without a mat.
- Select the appropriate material in Cricut Design Space based on your type of vinyl. (I chose “Everyday Iron-On” for my orange, yellow, and white vinyl and “Glitter Iron-On” for my purple glitter vinyl.)
Place each HTV with the shiny side down on the mat, as shown below.
Weeding the vinyl
Gently pull away any excess vinyl pieces from the carrier sheet until you’re left with only the design you want to transfer.
I find the Cricut weeding tool incredibly useful, especially when removing small holes or gaps within letters.

Step 3: Apply the heat transfer vinyl in layers
Cricut offers a Cricut Heat app if you’re using a Bluetooth-connected EasyPress 3 machine. This allows you to send heating instructions directly to the machine via the app.
If you own a different Cricut heat press, you can also refer to the Cricut Heat Guide online to manually enter the heat settings.
I strongly recommend using a Cricut EasyPress Mat to protect your work surface and provide stability as you press. Make sure you fold the tote bag flat and let the bottom of the bag hang off the mat to prevent bulk while pressing.
Heat Press Setting for Layering Glitter and Smooth Vinyl
When layering vinyl, you generally want to begin with the material that requires the highest temperature setting. Each layer will be pressed for a short amount of time just to “tack” the layer. Since the first few layers will receive multiple presses, we want to prevent those layers from scorching.
- Mark your design placement on the tote bag, if desired. I use a water-soluble pen to make the corners of my carrier sheets before I press my designs. It’s helpful to place the biggest layer down first, then determine where to place the glitter layer.

- Use a lint roller to remove dust and fibers from the tote bag.
- Then start by pressing the glitter iron-on vinyl. Since it requires a higher temperature (about 330ºF), you’ll need to let the heat press cool after this first layer. Select Glitter Iron-On as the transfer material, 100% Cotton or the appropriate fabric, and pre-heat the bag for 5 seconds. Press the glitter vinyl for only 5 seconds. Peel the liner when it’s cool to the touch.
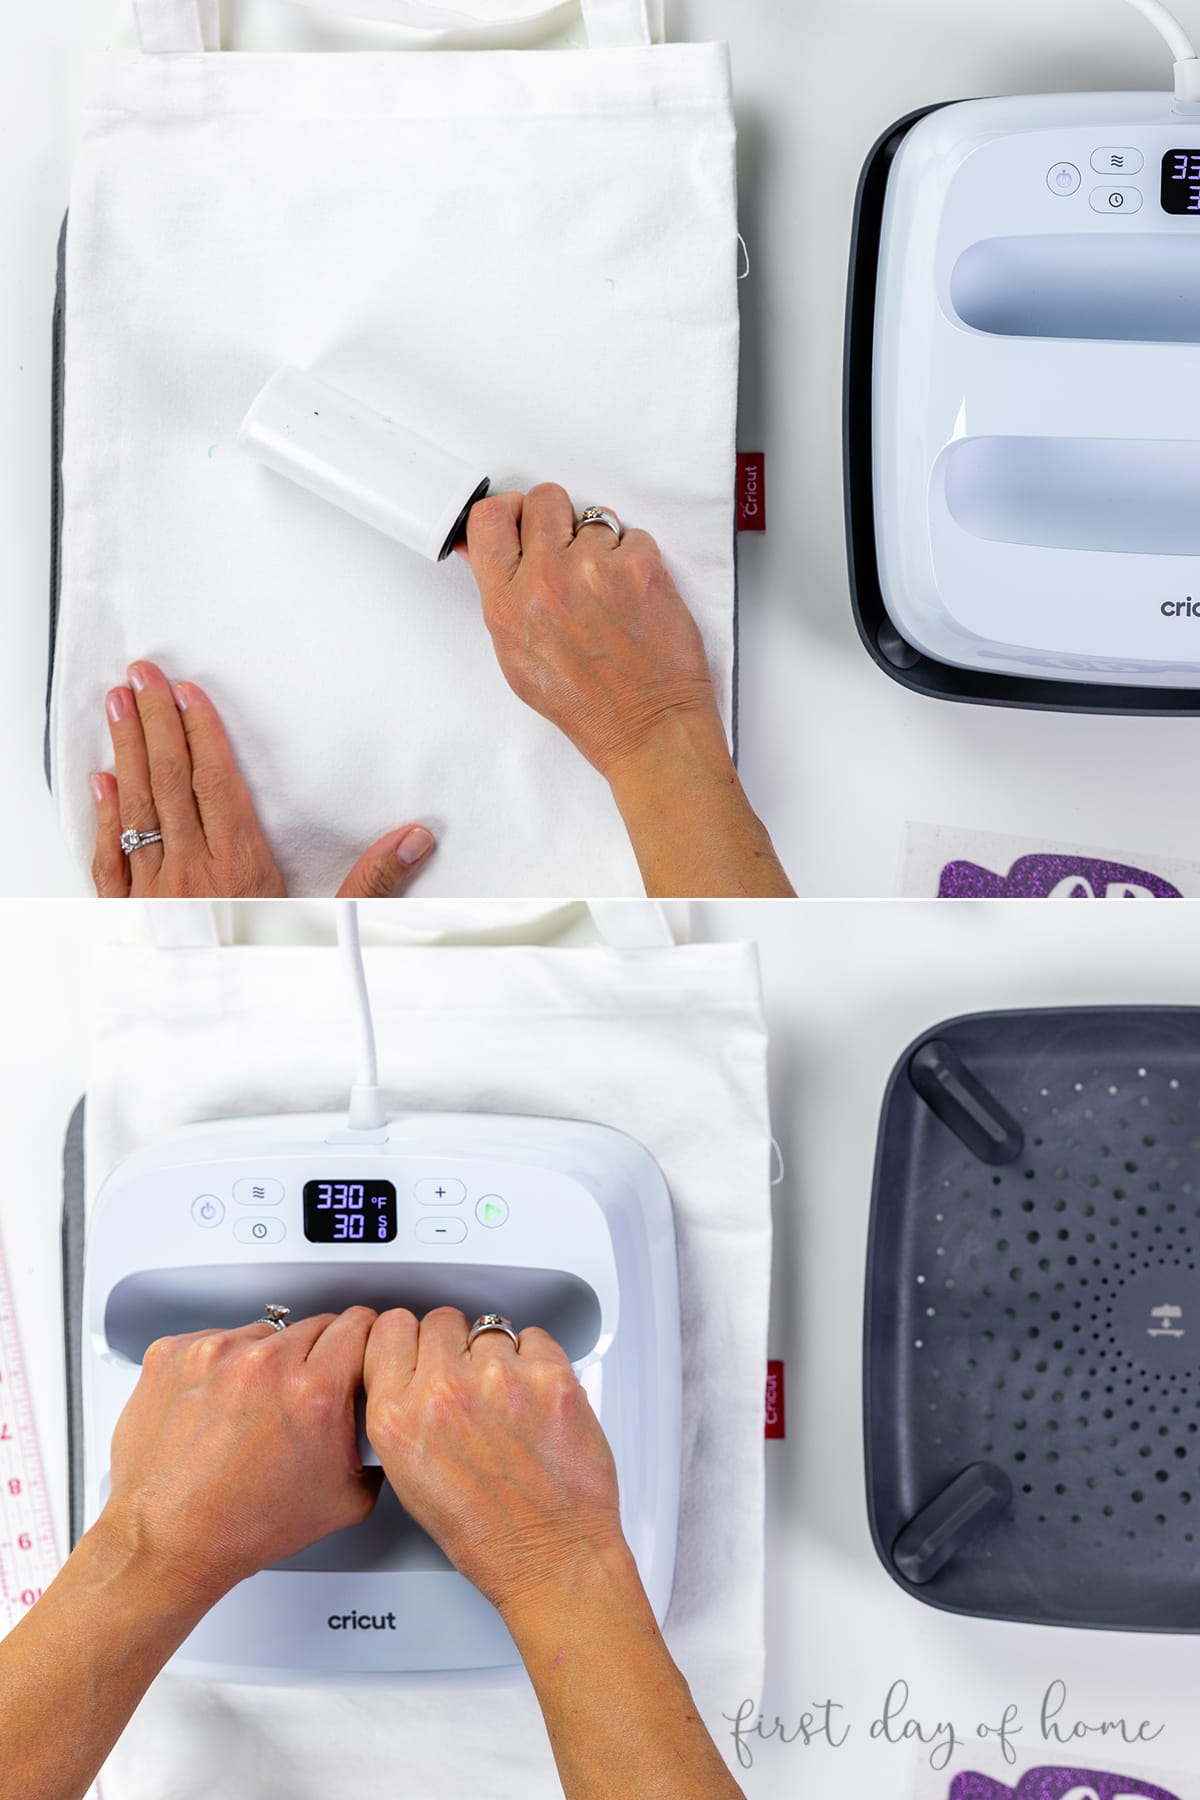
To protect layers you have already pressed, place a Teflon sheet down between the design and your heat press. This prevents any vinyl from adhering to the heat press.
- Adjust the heat settings for Everyday Iron-On vinyl. The temperature should be about 300ºF for Everyday Iron-On. Press this layer and each subsequent layer for only 3-5 seconds. Peel the liner when it’s cool to the touch.
- The final layer of vinyl can be pressed for 10-12 seconds.
Some vinyls may require slightly more or less time to “tack” or stick to the base material. I found that Smart Iron-On required a bit more time, especially with smaller pieces.
If you want to refer back to this article and share it with friends on Pinterest, click the image below to pin it.
Pin it for later!

More Design Options
If you’re looking for more Halloween characters, here are some of my favorite SVG designs for Halloween:
Care Instructions for DIY Trick or Treat Bag
Wait at least 24 hours before washing your Halloween bag. Do not dry clean the bag or use softeners or bleach. I recommend turning the bag inside-out and using a mild detergent and cold water if possible. You can hang your tote bag to dry or tumble dry low.
If you want to iron wrinkles in your bag after washing it, you can place a cloth over the design to prevent the iron from sticking to it.
I hope your kids get a lot of use out of their fashionable trick-or-treat tote! Or maybe you can enjoy it when passing out Halloween candy. Share your pics with me over on Instagram if you used this tutorial!
You Might Also Like