How to Laser Engrave Tumblers Like a Pro
Learning how to laser engrave tumblers opens up many possibilities for your hobby or craft business. Just imagine creating amazing designs to personalize gifts or add logos on a pretty tumbler. I’m hooked, and I think you will be too!

This tutorial is sponsored by xTool, but all opinions expressed are my own. This post also contains affiliate links, and I will receive a small commission if you make a purchase after clicking on my links. See disclosures for details.
Project Overview
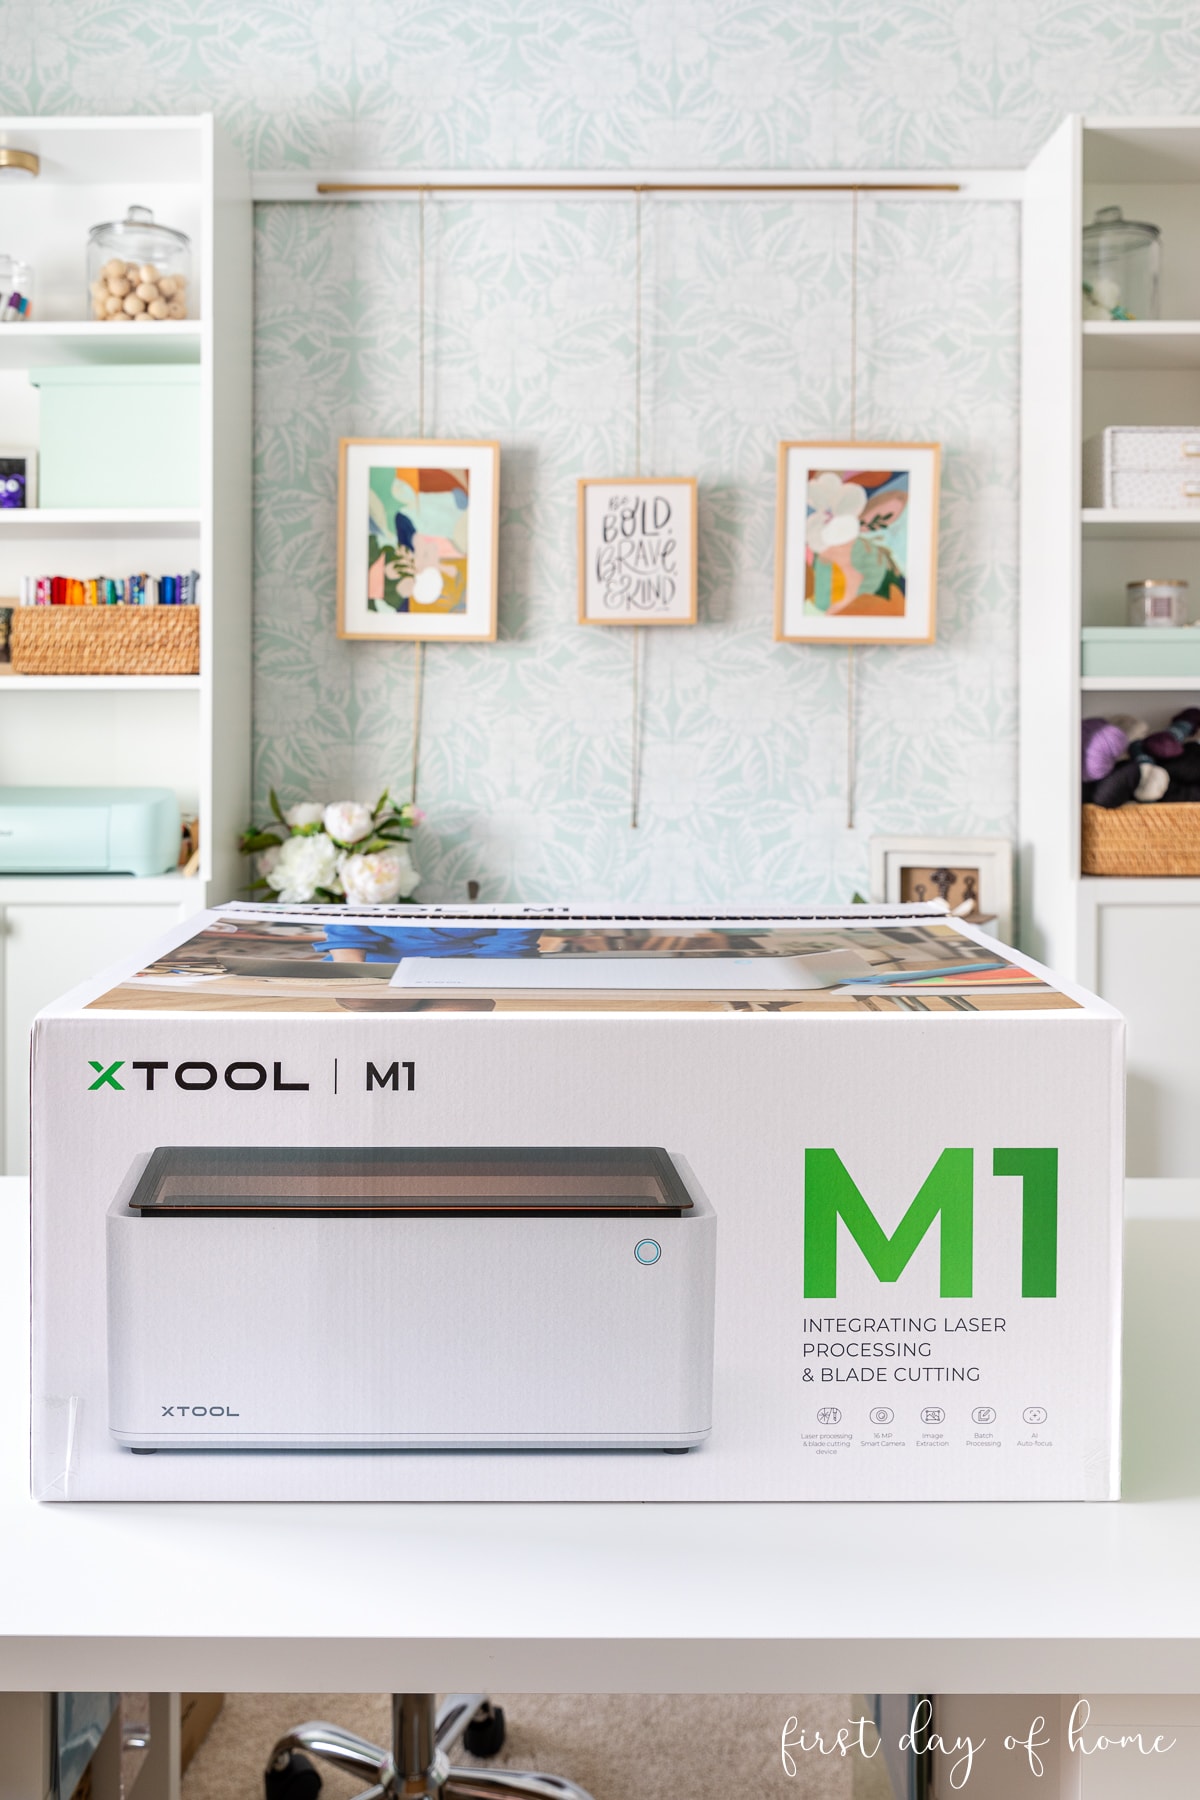
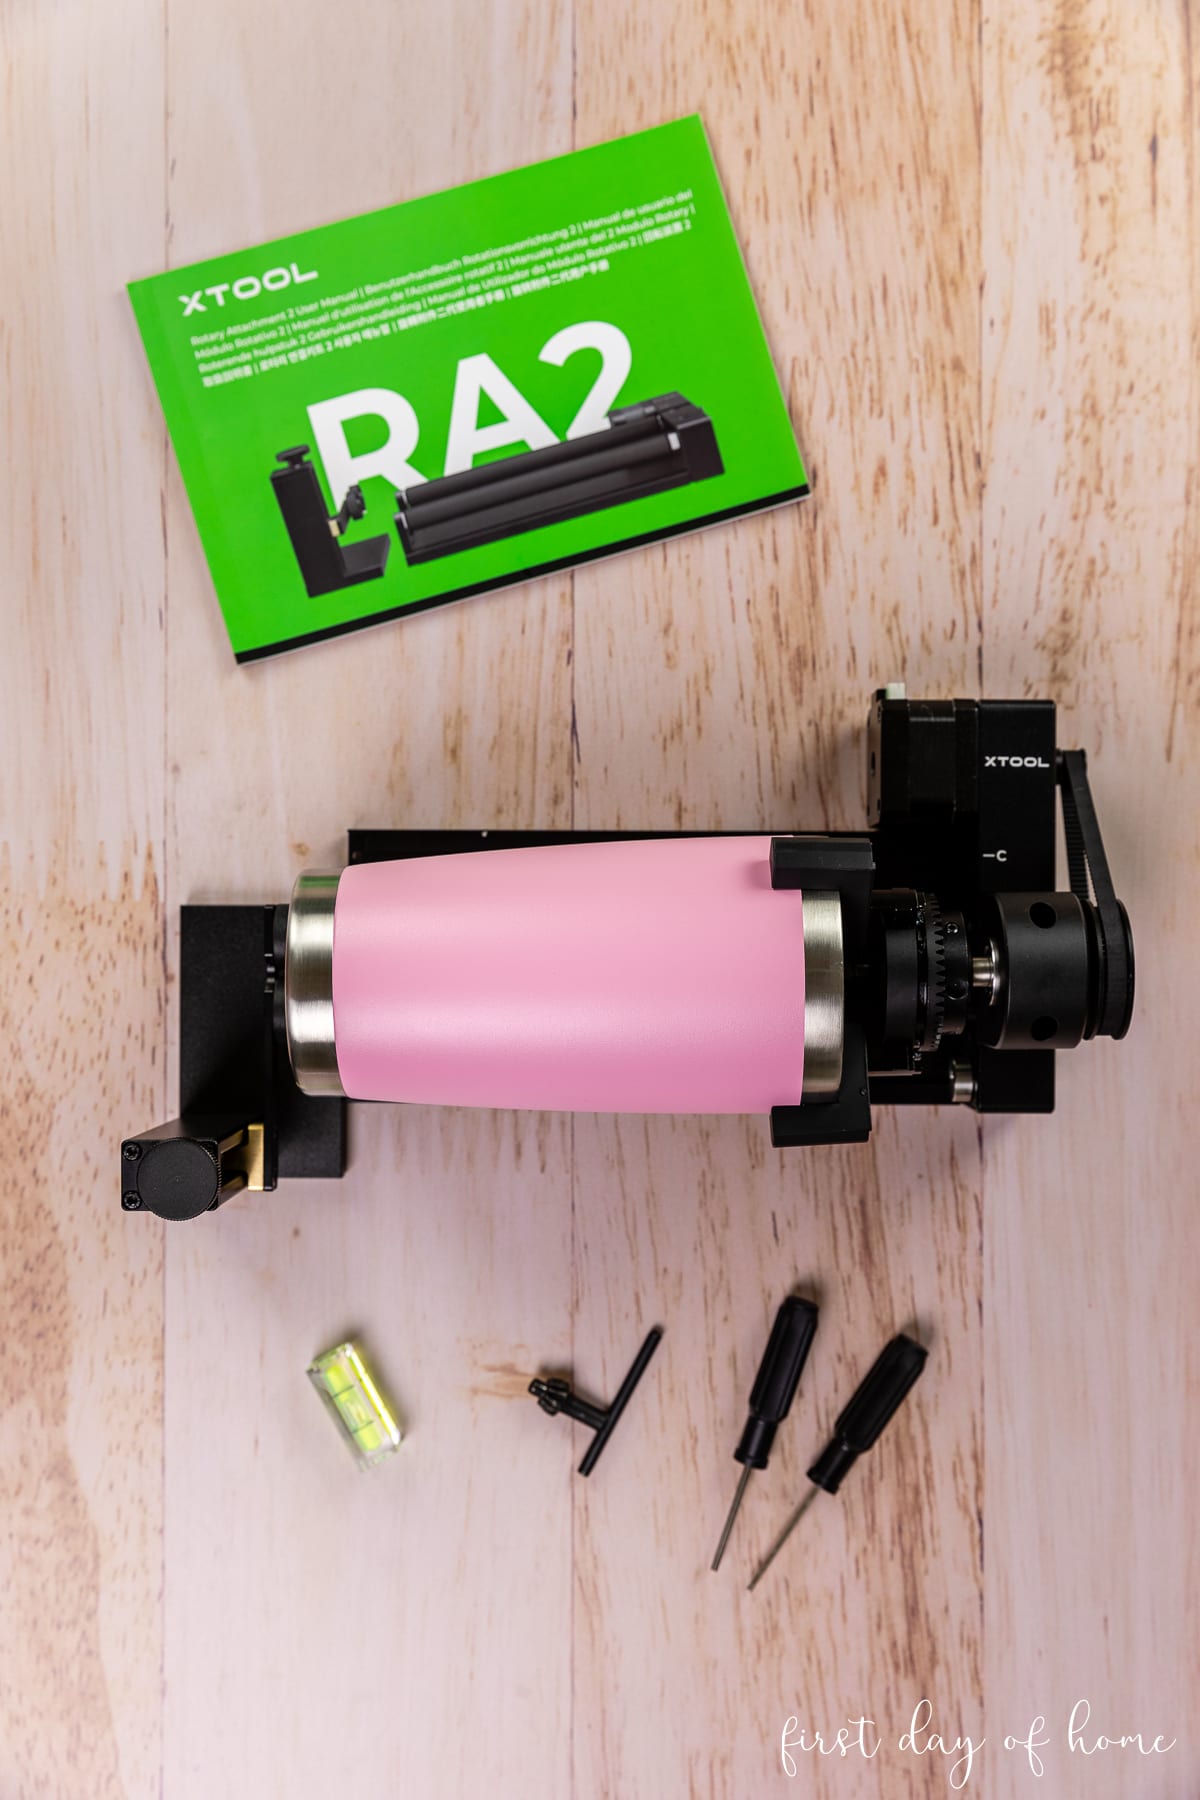
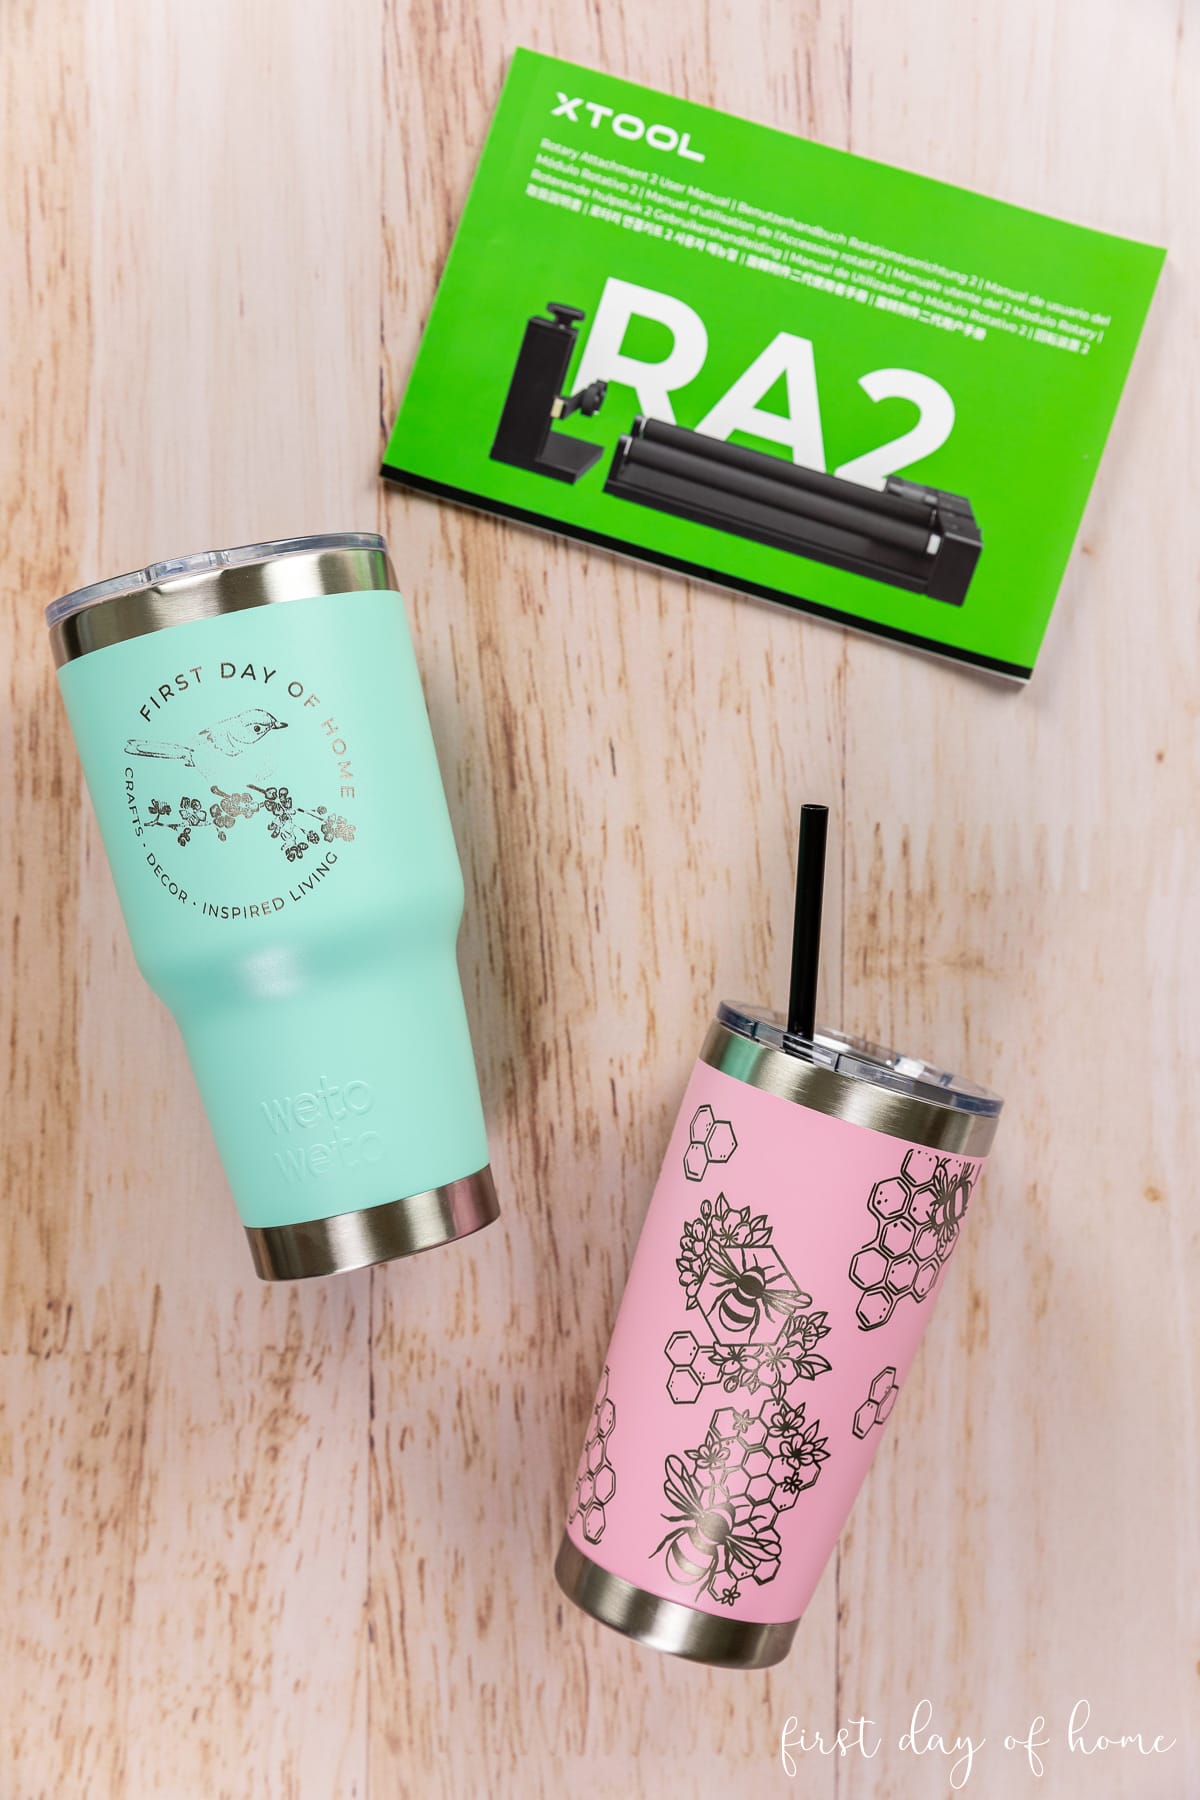
In this tutorial, I’m using the RA2 Pro Rotary Attachment with the xTool M1 (10W) machine.
The M1 is a diode laser with hybrid laser cutting and blade cutting features. It works with a wide range of materials and is perfect for hobbyists and small businesses. You can read more about it in my xTool M1 review.
The rotary attachment is also compatible with other laser machines. According to xTool, the RA2 Pro works with the xTool P2, S1, F1, and D1 Pro as well as most laser engravers on the market.
Special xTool Coupon
CURRENTLY ON SALE! Save $80 on your xTool M1 (U.S. store) with the discount code FDOH80! Redeem here.
How to Laser Engrave Tumblers
I’ll share two designs showing how to set up the xTool’s rotary attachment for various scenarios. Grab a stainless steel tumbler and let’s get started!
Supplies
- xTool M1 or similar laser engraver
- RA2 Pro Rotary Attachment
- Stainless steel tumbler (powder-coated)
- Smoke Purifier (recommended)
- Riser Base or Wooden Risers
- Rubbing alcohol, Bar Keeper’s Friend, Magic Eraser, or Dawn dish soap
Tumbler Tips to Keep in Mind
- Run some tests on cheaper tumblers before you engrave an expensive stainless steel Yeti tumbler or Stanley tumbler.
- Tumblers with logos are trickier when doing a “full-wrap” design (where the design wraps around the entire mug).
- For stainless steel tumblers without a powder coating, you’ll need a laser marking spray or tempera paint to coat the tumbler before engraving.
- Use a non-tapered tumbler for your first project. It makes the measuring and leveling process simpler.
- If the tumbler has a handle, consider whether you can remove the handle or not. Some handles have screws allowing easy removal, and others don’t.
Step 1: Set up the Rotary Attachment
When I first received the RA2 Pro Rotary, I’ll admit I was a bit overwhelmed.
With this one attachment, you can work on various cylindrical objects, from wine glasses and stainless steel mugs to spheres. For this reason, there are a lot of parts!

Have no fear! I’ll show you exactly how to set up the attachment and connect it to your laser engraving machine.
The standard Rotary Attachment comes with rollers that rotate with an object resting on top. This works well for objects with a perfect cylinder shape.
Check out my glass laser engraving tutorial for a roller rotary example (see below).

For today’s tutorial, I’ll be using two different sizes of powder-coated tumblers with unique shapes. Since the objects aren’t perfectly cylindrical, I’m using the jaw chuck rotary instead of the roller setup.
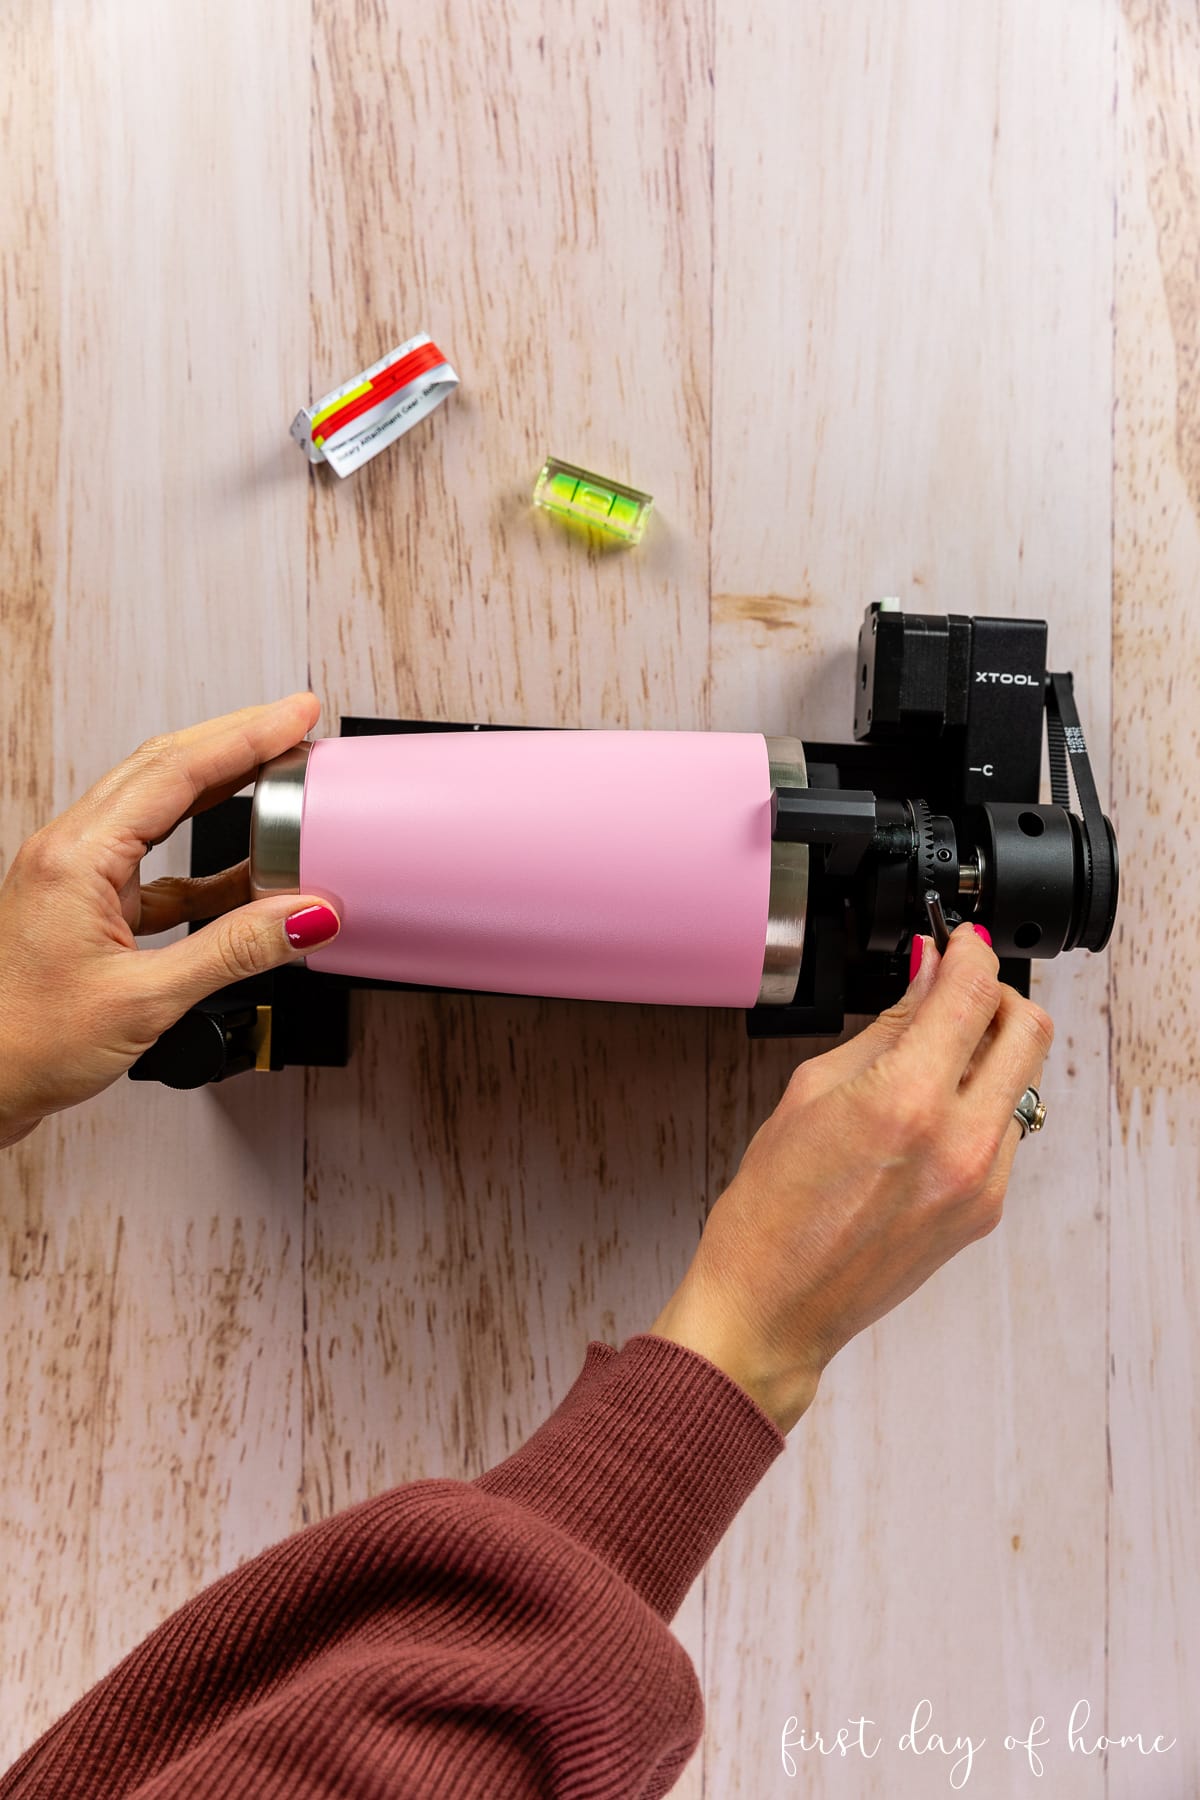
The jaw chuck is the attachment that uses clamps to hold your object in place, as shown above. You can use various configurations of the jaw components (single step or double step) to find the perfect fit for your tumbler.
The instruction manual comes in handy for this step!
Once you’ve found the best configuration, tighten the clamps around your object using the provided key.
Note
Objects can be gripped with the clamps on the outside of the tumbler or pushed out from the inside of the tumbler.
Step 2: Measure the tumbler
Use the provided measuring tape to determine the perimeter of your tumbler. I like to wait until the tumbler is fixed in the chuck to take my measurements.
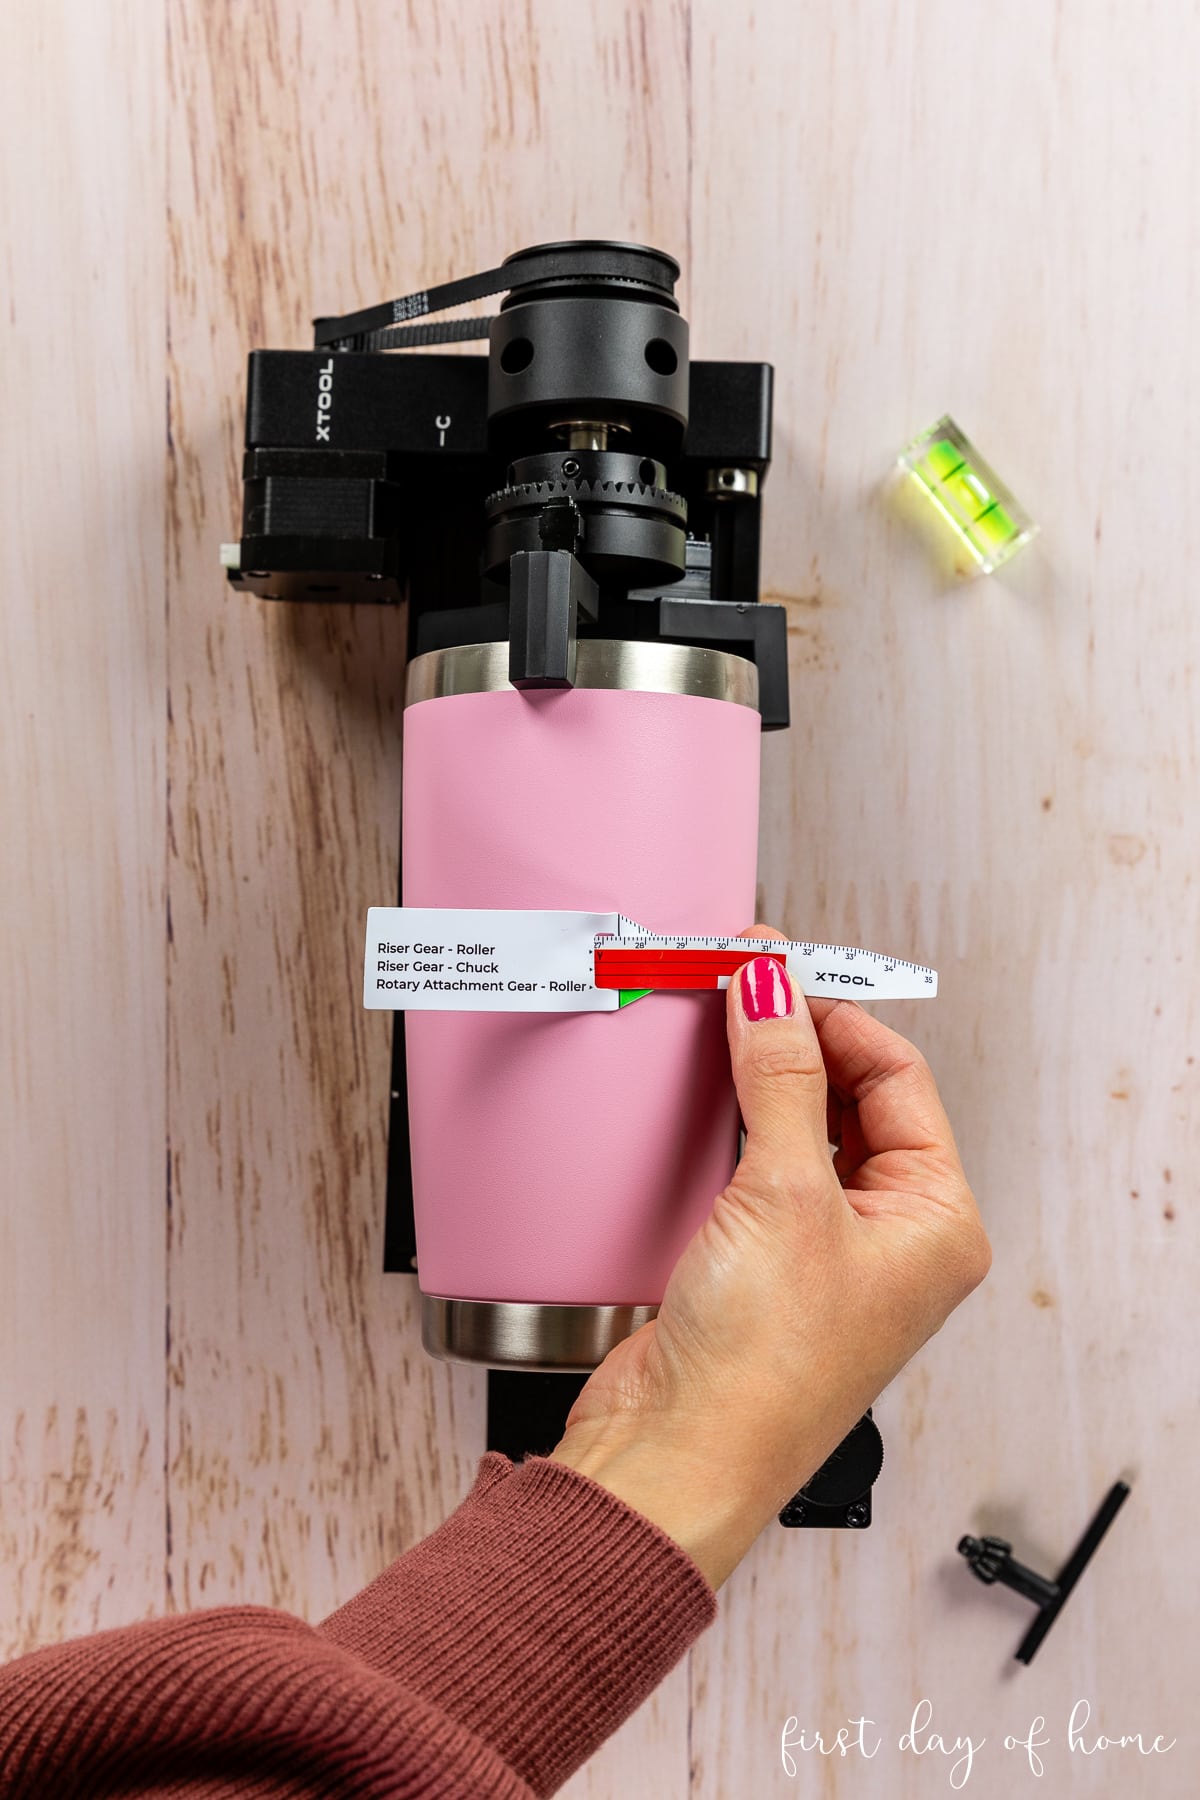
For a tapered tumbler, measure around the midpoint of the tumbler. Mine was about 273 mm.
If you have an extreme taper and plan to engrave the entire body, you can average the circumference at the widest and narrowest points.
The measuring tape will indicate which riser setting you’ll need (whether you’re using the Riser Base or the wooden risers included with the M1). I’m placing my Honeycomb Panel on the Y setting, as shown below.

Note
Double-check your unit of measurement in the xTool Creative Space software. Lots of errors can happen when you mix and match inches with millimeters!
Step 3: Attach the Rotary to your laser machine
Place the Rotary inside the machine, setting it to rest on the Honeycomb Panel (or Base Plate if using wooden risers).
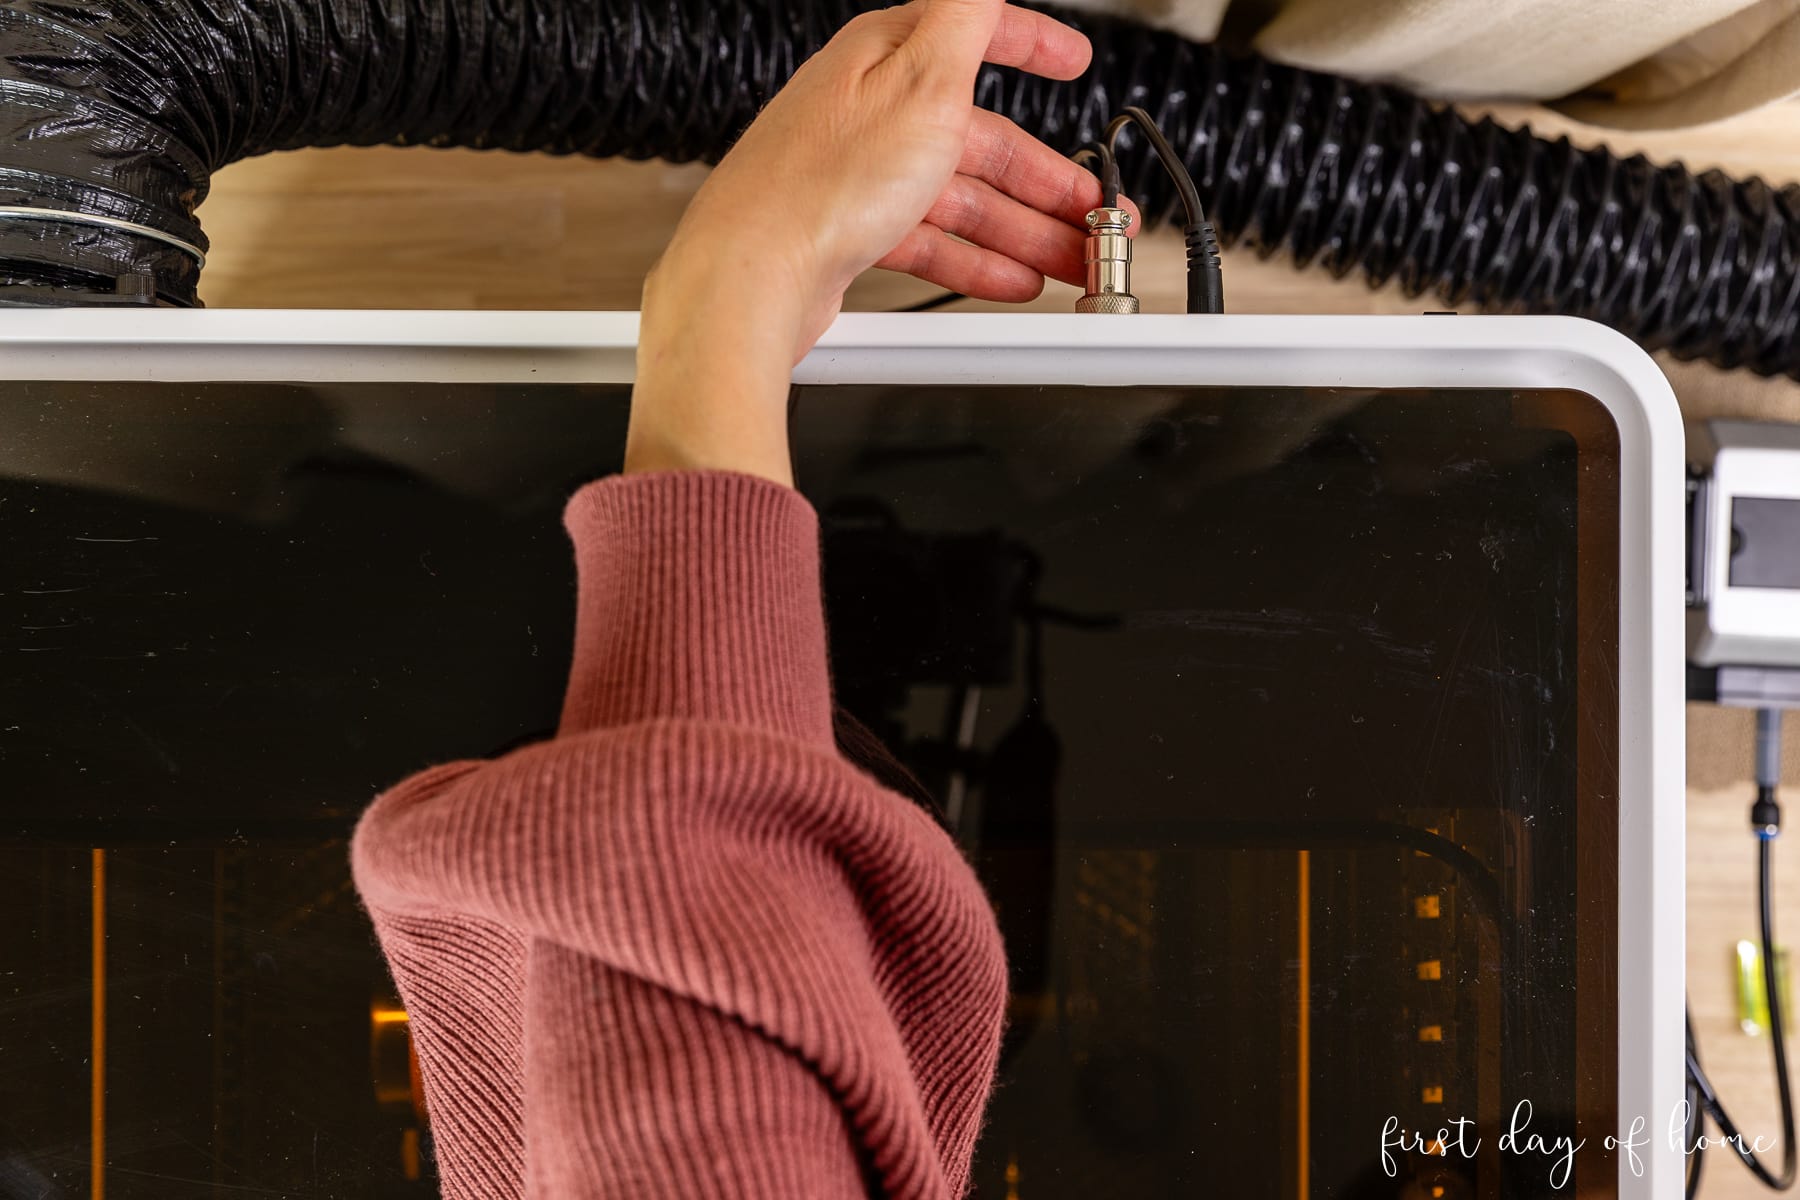
Connect the Rotary to your machine using the cord provided with the RA2 Pro, as shown above. You can feed the other end of the cord through the slot at the bottom of the Riser Base if you have one.
Step 4: Level the tumbler
After you turn on the machine, move the Rotary until the red dot is centered at the highest point of your tumbler.
Using the provided Support Module, you can raise or lower the end of the tumbler to make sure it is level. This step is really important to prevent any distortion of your design.

Note: If you own the Air Assist Module for the M1, you do not need this to engrave a tumbler. Place the head of the module in the provided clamp instead, as shown above.
Step 5: Format your design in xTool Creative Space (XCS)
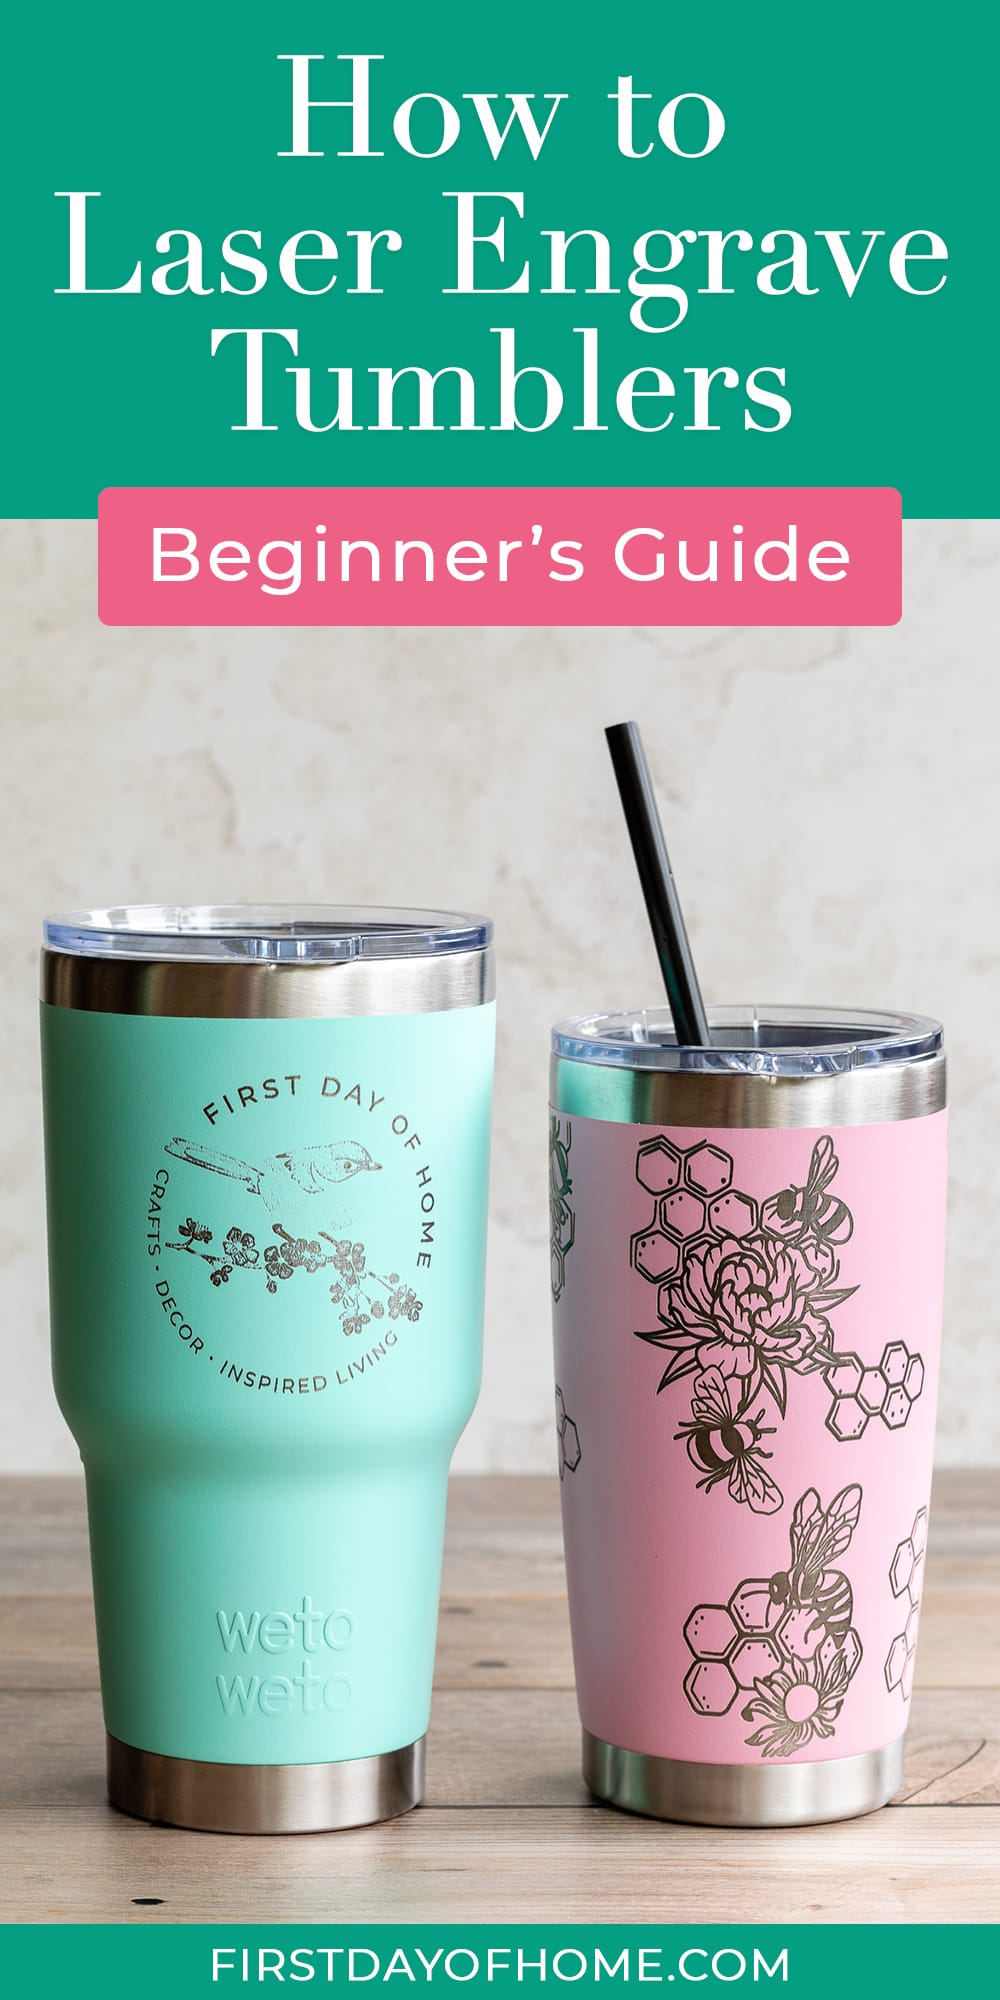
For the pink tumbler, I’m using a honey bee SVG file that I purchased on Etsy. The design is formatted to wrap around a 20 oz. tumbler.
You can use any graphic design software to create your image. XCS also has plenty of free shapes and fonts available too. You’re only limited by your creativity!
After choosing Image in the left menu and uploading the file, I selected Engrave as my processing type.
Currently, the XCS menu doesn’t have a pre-set engraving material for tumblers, so I’m listing my preferred settings below.
Settings for Engraving Powder-Coated Tumblers
- Power: 90-100% (your preference)
- Speed: 150 mm/s
- Pass: 1
- Lines: 200 lines per cm
- Engraving Mode: Bi-directional
Step 6: Update Rotary settings in XCS
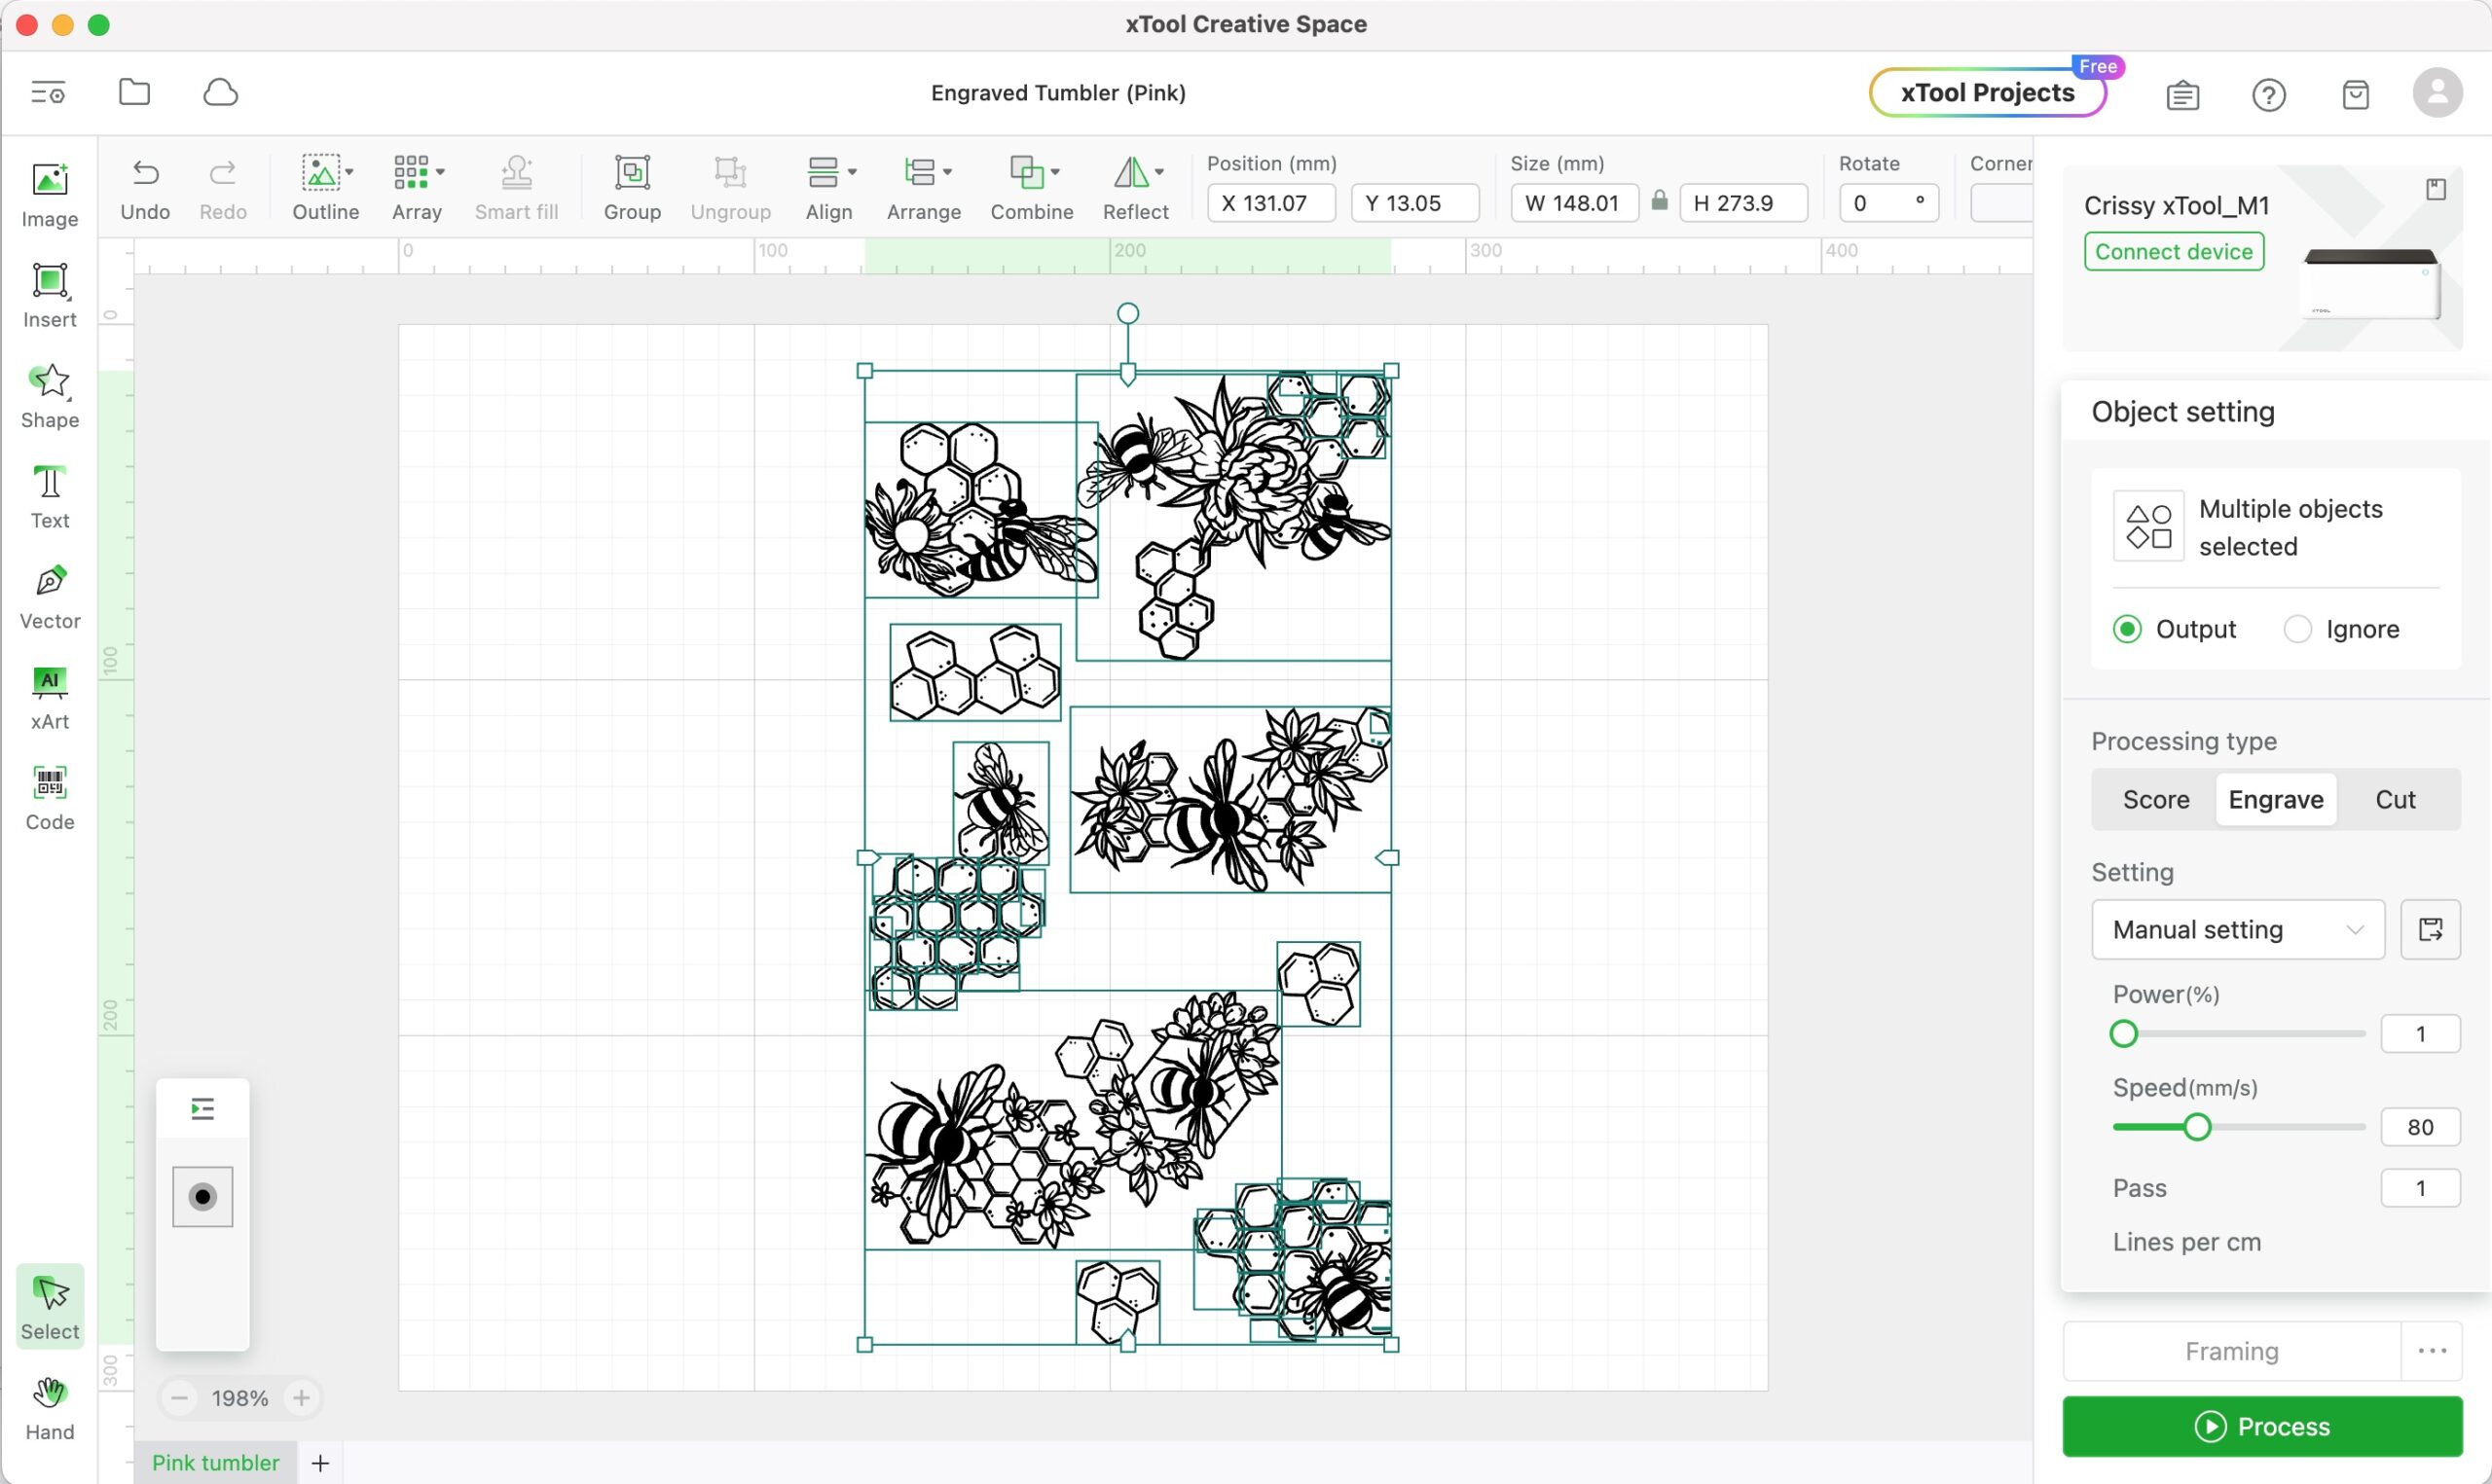
When you work with cylindrical objects in the xTool software, start by choosing Laser Cylindrical in the first drop-down menu. Then select Chuck as the Mode.
You’ll see a green line appear on the canvas when you refresh your camera view. This marks the starting point of your engraving process. You can drag the line anywhere along the image of your tumbler.
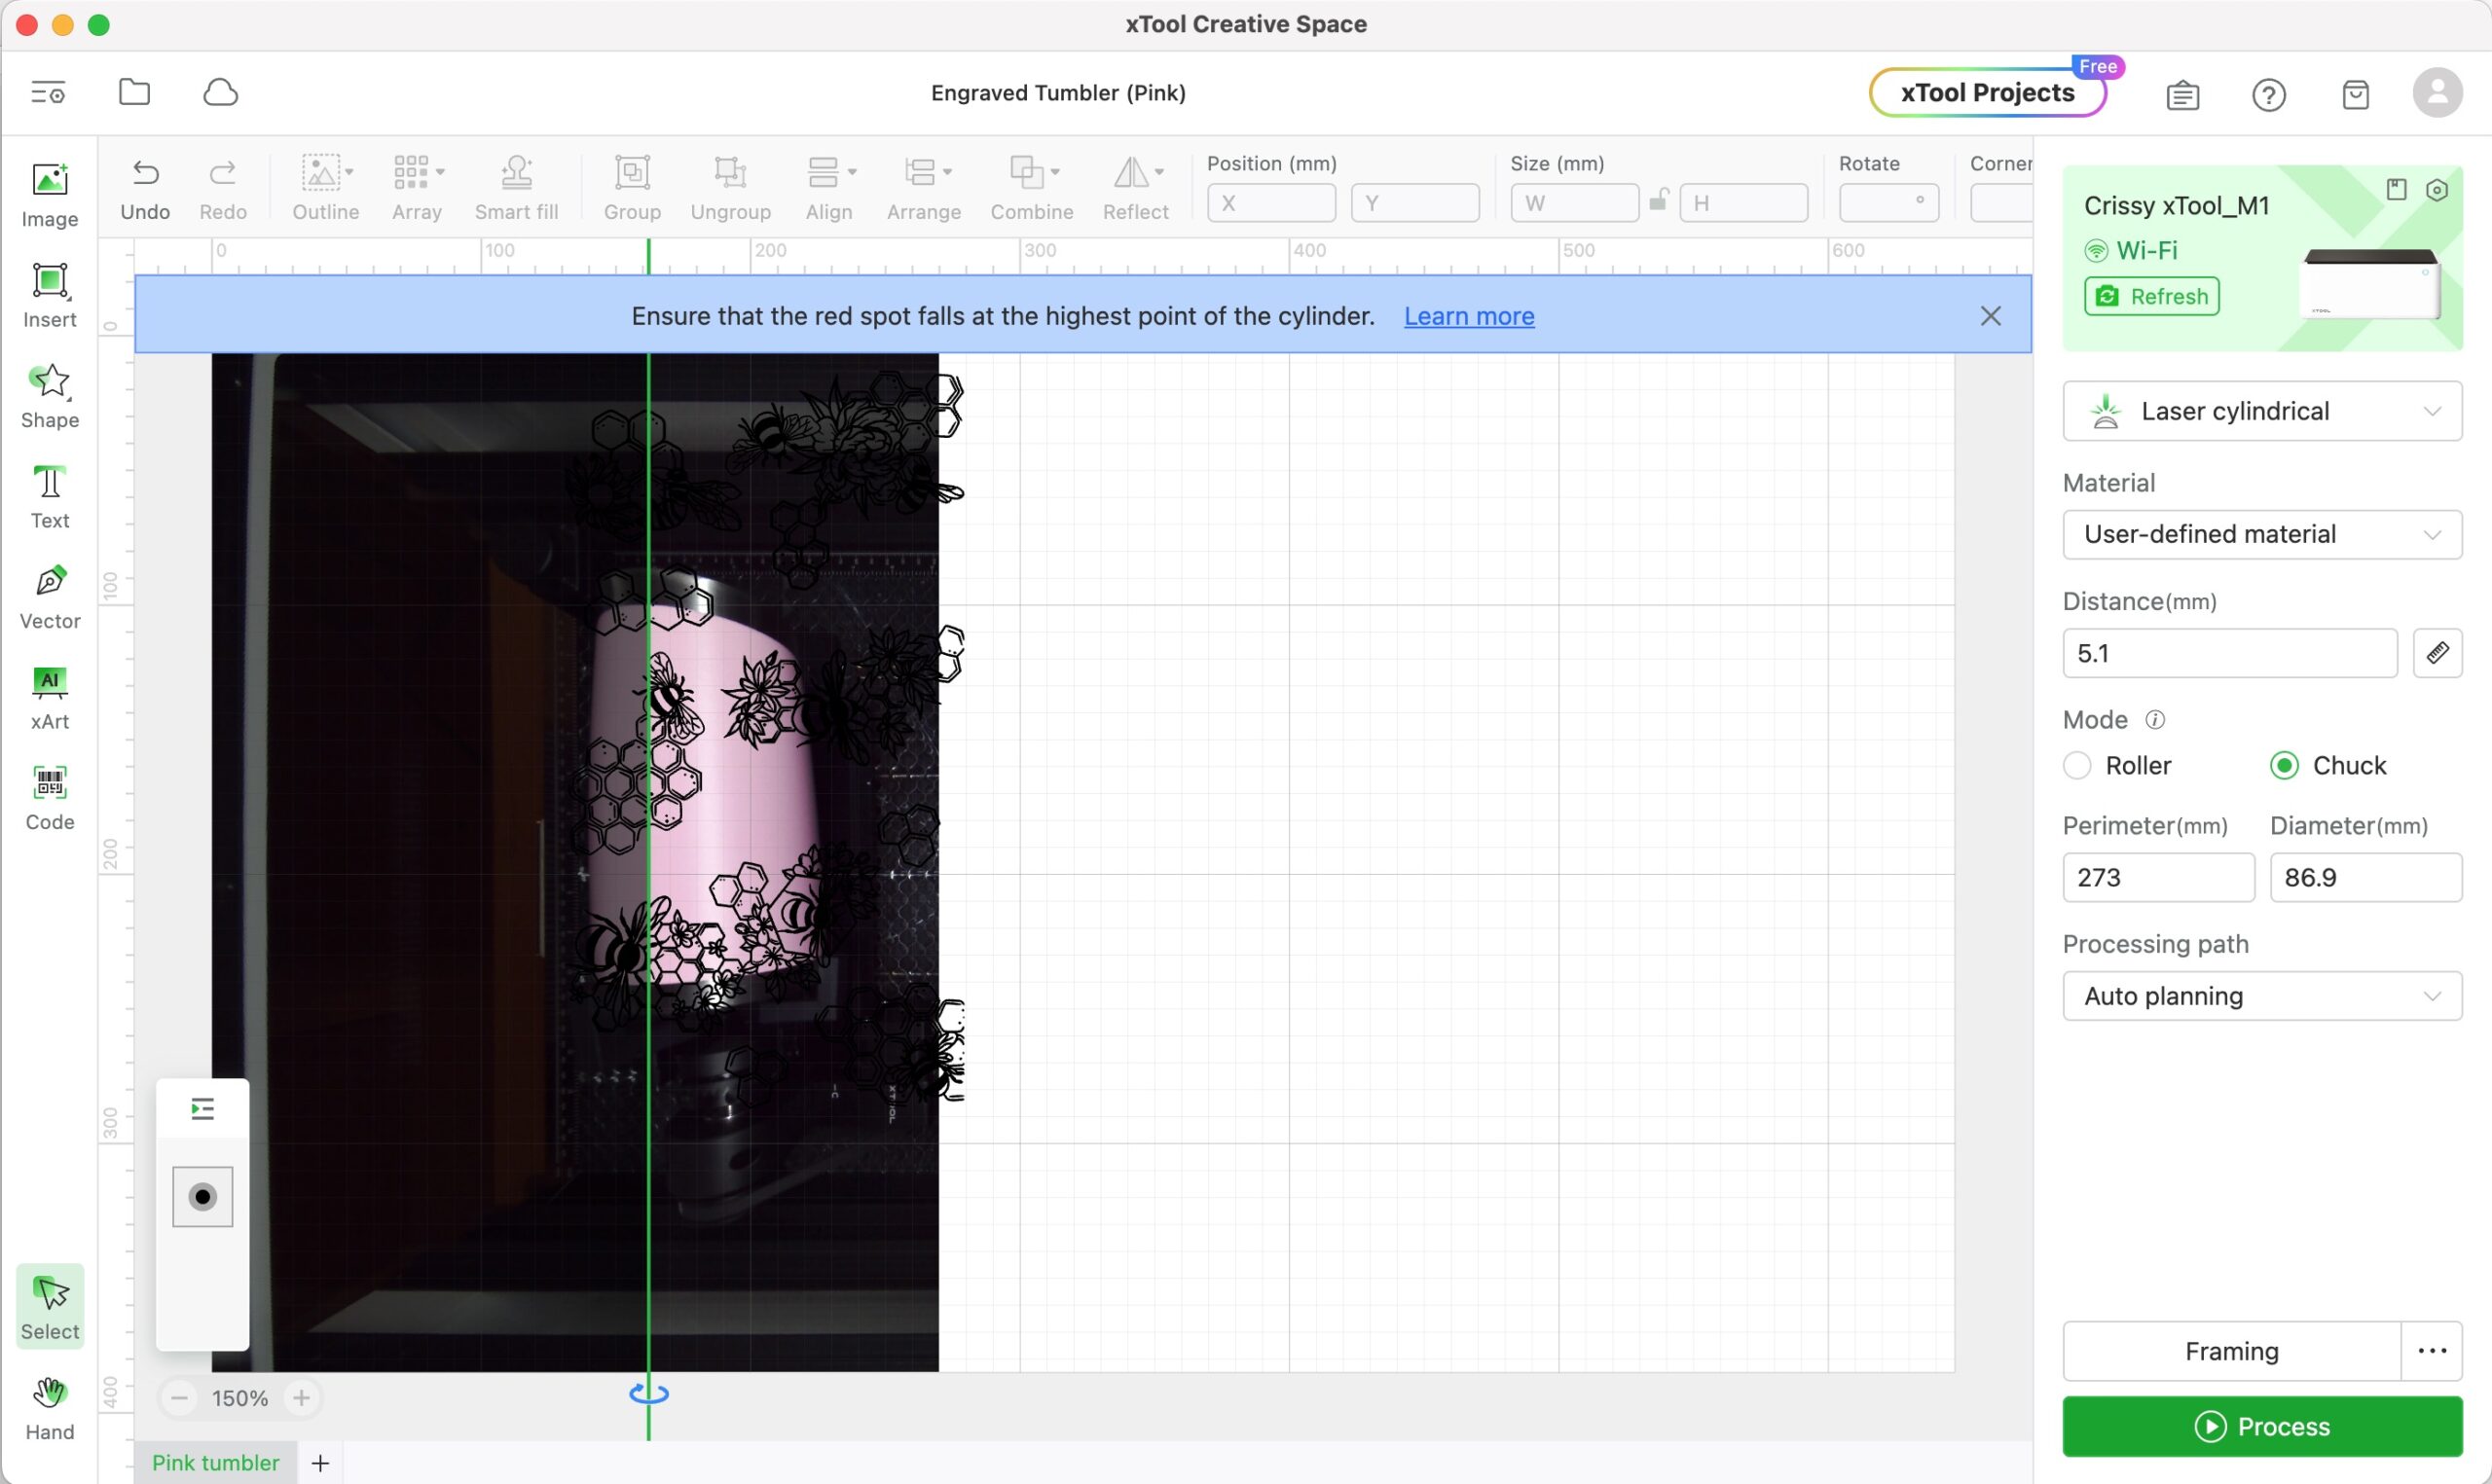
Here you’ll enter the perimeter you measured. (The diameter will automatically calculate.) You’ll also hit the ruler icon to auto-measure the distance to the tumbler.
Next, arrange your design next to the green line without overlapping it, as shown below. You may need to rotate the design to make sure it is facing the right direction. (I actually flipped the image 180º after I took the screenshot below.)

The design will look like it extends beyond the tumbler. That’s completely normal! Just make sure the length and width of the design are no bigger than your tumbler dimensions.
Finally, select all elements of your design by clicking and dragging over it. Then choose Combine>Unite in the main menu.
This last step tells the machine to process the design together as one image instead of skipping back and forth over the various elements.
Step 7: Perform the framing process
Always frame your design before processing. The Framing button gives you a preview of the laser engraving process. Then you can make tweaks to your design placement as needed.

Framing also helps to check the rotation of the Rotary Attachment to ensure the tumbler doesn’t wobble as it turns.
Step 8: Process the design
It’s finally time to process your laser engraving project!
Once you hit Process and the Start button in XCS, you’ll want to do the following things, in order:
- Make sure your exhaust hose is venting to the outside.
- Turn on your smoke purifier (if applicable).
- Hit the button on the front of your M1 machine to begin engraving.
- Do not leave your machine unattended. You can always pause the operation in the software if you need to take a break.
Safety First
Always operate laser equipment in a well-ventilated area using the proper air filtration recommendations like an exhaust hose to the outside and/or smoke purifier.
Step 9: Clean the laser-engraved tumbler
The design will look black right after engraving. Before removing the tumbler from the Rotary, check to make sure the engraving looks as expected. Sometimes you can process the design a second time if you keep the tumbler in place.

Next, it’s time to clean the tumbler. I tested rubbing alcohol, Magic Eraser, and Bar Keeper’s Friend with a sponge to shine my tumbler. The latter two products did the best job, but you can start with what you have.

I’m amazed at the precision of the M1. My tumbler looked like something the professionals would sell. I’m convinced this machine is the best laser engraver for DIY enthusiasts given its high precision but reasonable price tag.
How to Laser Engrave Tumblers with Logos
Many people want to engrave all shapes and sizes of Yeti products or Stanley tumblers. This presents the challenge of dealing with a tumbler logo.
To get everything aligned, I added a small piece of painter’s tape that lined up my design with the center of my tumbler logo (see below).

Simple steps like this will help with your project accuracy.
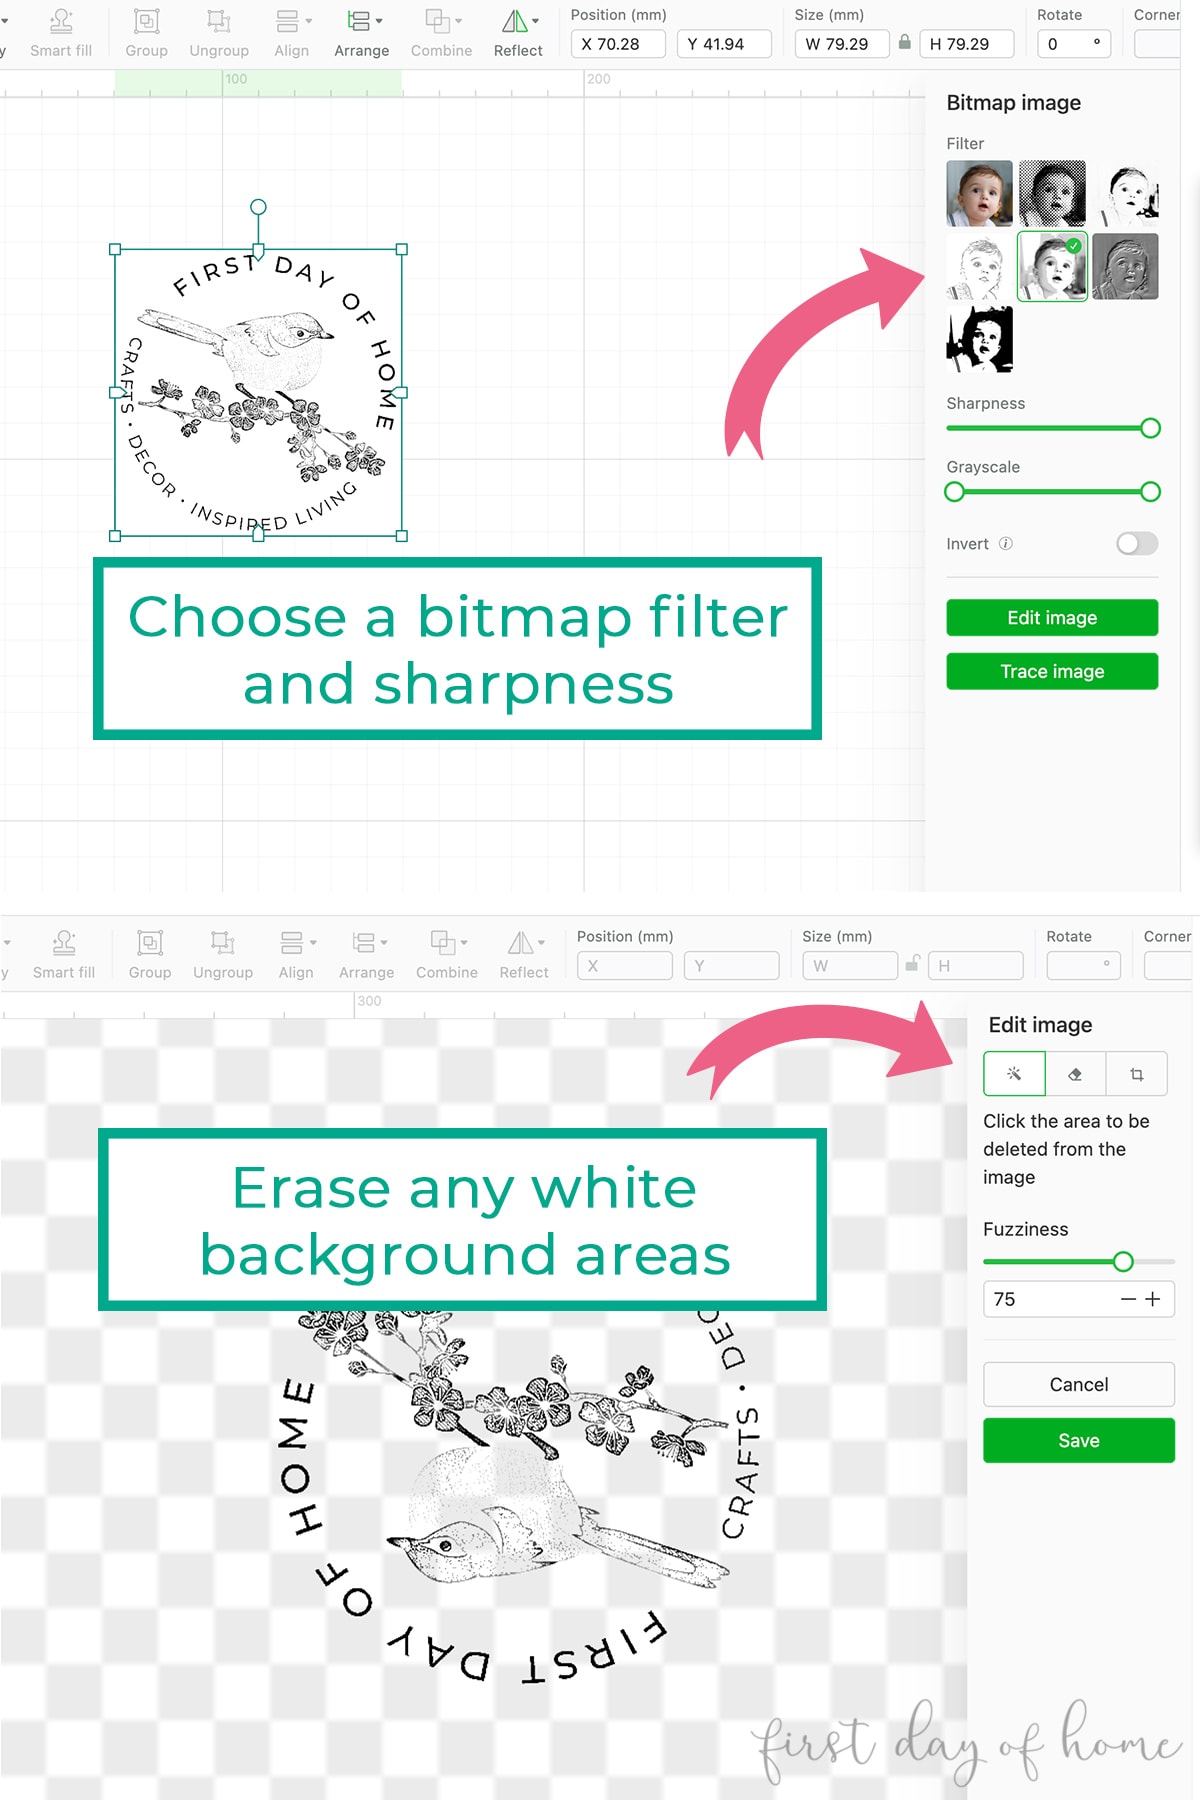
You’ll notice this design was a .png version of my blog logo that I converted to a bitmap engrave project. I first selected the Comic 2 filter and then chose Edit Image to manually remove the white background.
For this 30 oz tumbler, I placed the single-step “jaws” of the chuck on the inside instead of on the outside. This is an excellent option when your tumbler is oversized.
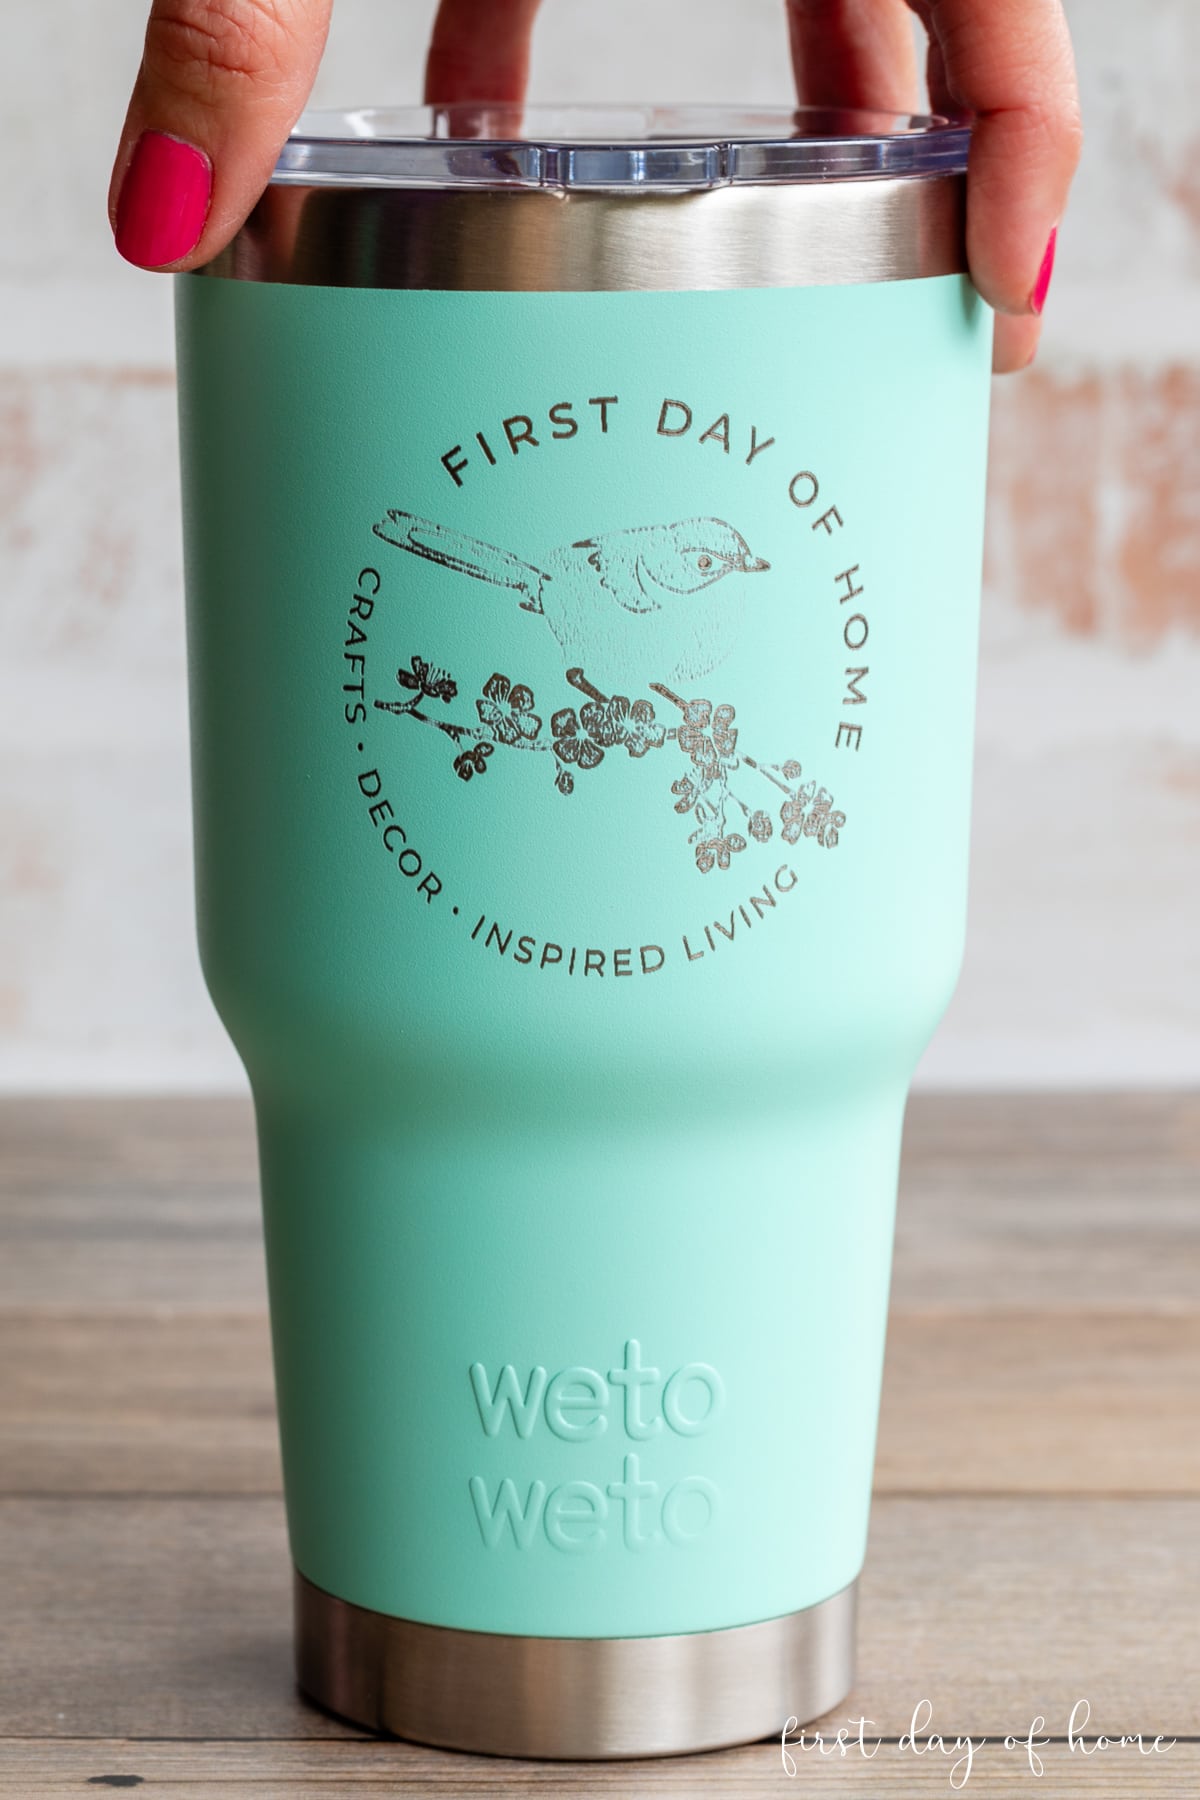
I’m very pleased with the results of this simple design. It was tricky given the light colors of the original png, but I love the vintage look. Having the ability to make DIY swag for my small business is pure perfection!
General Tips for Successful Tumbler Engraving
I hope these step-by-step instructions will have you making professional-looking tumblers in no time! If you’re having trouble, here are a few tips that may help.
- Set up a material test grid in xTool Creative Space to run various combinations of power and speed tests to determine the best engraving settings.
- Clean the lens of the laser before engraving. You can find detailed cleaning instructions from xTool, but generally, you need to use a cotton swab to gently rub the lens and remove any debris.
- You can also lower the power and speed of the framing function by clicking the three dots next to the Framing button. I suggest lowering the power to 1 to avoid accidentally leaving a permanent mark from the high-powered laser beam.
Pin it for later!
Please consider sharing this tutorial on Pinterest to spread the word. I’d love to see your engraved tumblers on social media too! (Tag me @firstdayofhome.)
You Might Also Like…