Decoupage Cans: Easy Upcycle Project
I’ll never look at a tin can the same way again. You know I love repurposing items that usually get thrown out as trash. These decoupage cans could be some of my favorite upcycling creations to date! I hope you enjoy personalizing them to match your decor as much as I did.

This post contains affiliate links, and I will be compensated if you make a purchase after clicking on my links. For more information, please see my disclosures.
The Basics of Decoupage
I’ve created countless decoupage projects over the years, so I sometimes take it for granted that my readers know the basics. If you’re unfamiliar with this technique, check out my complete guide to decoupage for a brief history and sample projects.
Here’s the skinny. If you can use glue, you can make this project. I love this project not only for its simplicity but also for its versatility to serve as both decor and craft room storage.

I’m using my finished cans to help organize my
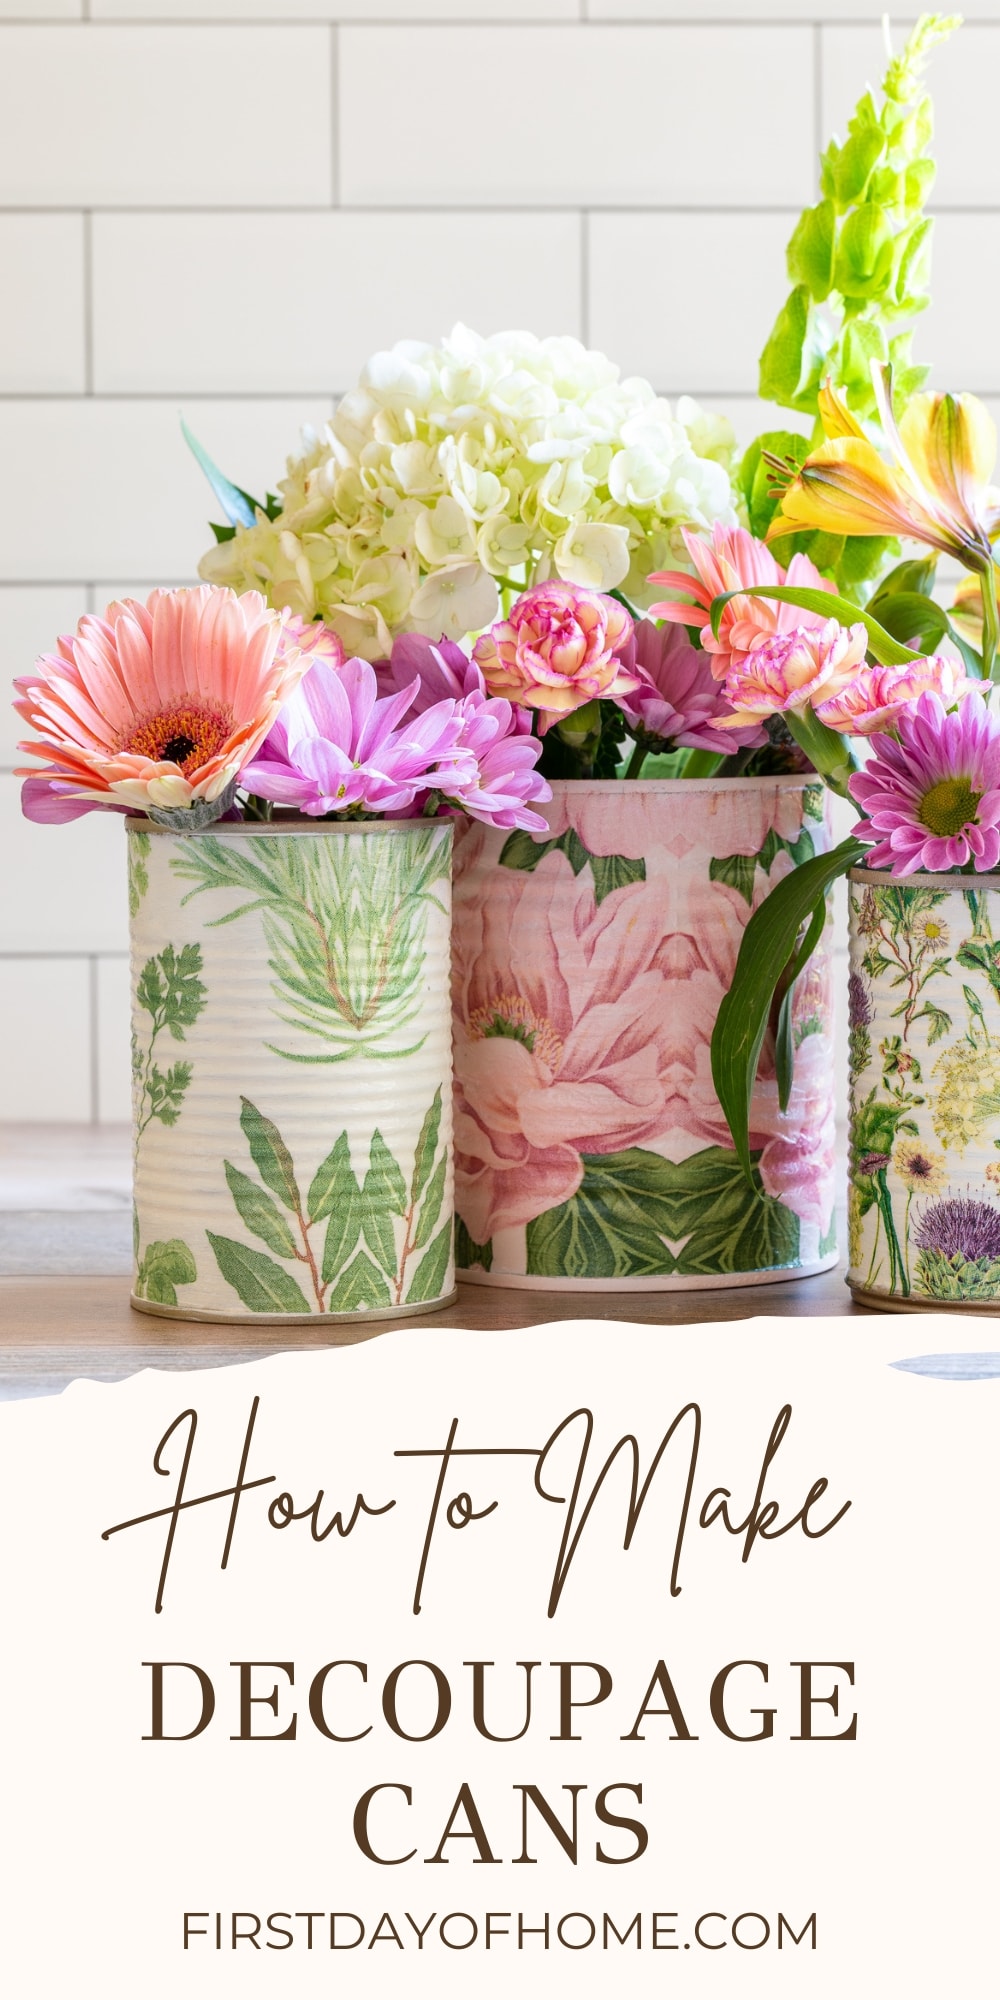
The thing is, these cans are cute enough to work as a vase for a floral arrangement! I would proudly display these as centerpieces for a bridal shower or ladies’ brunch. There’s a little trick to using them for fresh flowers, so keep scrolling to get the details.
Watch This Tutorial (1 Minute)
How to Decoupage Cans
This is the ultimate thrifty craft since you can use any tin can from the pantry. I chose cans from charro beans, evaporated milk, fruit cocktail, and other common items we consume. (I think I’m revealing a lot about our eating habits here!)
When shopping, you may want to consider what size of canned goods you’d like for your intended project. Grab large cans if you need a wide storage/vase solution. You can decoupage metal of just about any size.
It takes very little time to prep tin cans for decoupage. The main consideration is removing sharp edges and coating the cans with a layer of paint before you begin.
Supplies
- Tin cans (any size)
- Decorative napkins (pink floral, green botanical, pink peonies, wildflower mix)
- Mod Podge
- Spray paint or acrylic paint
- Foam brush or paintbrush
- Printable vinyl (optional for labels)
Step 1: Clean and prepare tin cans
Start by removing the paper around the tin can. Sometimes a good soak in hot water can help loosen the glue used to adhere to the paper. I also suggest using Goo Gone to remove any stubborn glue residue.
Make sure the rim of the can doesn’t have any sharp edges. You can use a pair of pliers to press down any ragged pieces of metal.
Step 2: Paint the cans
I tested a mix of spray paint and acrylic paint. The spray paint is quick and easy to apply, but you definitely need proper ventilation. Acrylic paint may take a few more coats to get full coverage.

I had planned on spray painting all of my cans in a mix of blush pink and gold. The pink looked great, but I didn’t like how the gold paint looked under the napkins. It was easy to paint the can white to cover the gold, however (see above).
Tip
Use light-colored paint as your base for decoupage when using thin napkins or paper. This will help your design to look more vibrant.
Step 3: Apply napkins with Mod Podge
You can use various types of paper for decoupage, from rice paper to scrapbook paper. My favorite material is thin napkins, which make the finished designs look painted. Plus, you can reuse any excess napkins for parties.
Think about how beautiful a tablescape would look with matching vases and napkins!
Start by separating all the plies of the napkins to isolate only the printed layer. If you struggle with this step, use a small piece of tape to pull the bottom layers away from the top layer. Next, measure the napkin around the tin can and cut it to size.

Then, apply a thin layer of Mod Podge to one section of the can (about 2 inches at a time), and place the napkin down gently. I like using a foam brush for this step.

It helps to work in small sections rather than apply Mod Podge all over the can. You could literally end up in a sticky situation otherwise!
To remove air bubbles, use a small piece of food wrap to press the napkin down into the grooves of the can. This also prevents your fingertips from sticking to the napkin and potentially tearing it.

If your napkin overlaps at the end, use a paintbrush with water to dab the napkin along the edge. Then simply tear away the excess piece.

Step 4: Seal the decoupage cans (optional)
I love how these cans look unsealed, but I added a top coat of Mod Podge for more durability. Make sure the first layer of Mod Podge has completely dried (about 30 minutes to an hour) before applying a protective coat.

Mod Podge is both a glue and sealer, which makes it perfect for a craft like this. I chose the matte formula of Mod Podge for this project, but you can also use Mod Podge Gloss or Mod Podge Sparkle if you want a different finish for the top coat.
Step 5: Create labels for cans (optional)
The cans look adorable without any further embellishment. However, I couldn’t resist making a few labels for them with my Cricut.

The

Ways to Use Decoupage Cans
These upcycled cans have unlimited possibilities for both decor and storage. If you plan to use them as floral centerpieces, place a glass mason jar inside to fill it with water without worrying about rust or leaks. You can also make decoupage tin can planters for outdoor use.
Here are a few more ways you can use decoupage cans:
- Bridal shower centerpieces
- Custom candleholders
- Holiday centerpiece for Independence Day, Thanksgiving, or Christmas
- Utensil holders for parties
- Paintbrush holder
- Makeup brush holder
I could go on, but I want to hear how you plan to use them! Leave a comment below to let me know, or tag me on Instagram when you make these (@firstdayofhome)!
Pin it for later!


Hi Crissy! I have hear that Mod Podge yellows over time. Have you ever had this issue?
Hi Cheryl! I haven’t had any issues with Mod Podge turning yellow over time, but sometimes the paint you use underneath could turn yellow. This sometimes happens if you sand down a stained piece of wood and then paint it. (In that case, if you’re worried you could paint a coat of Mod Podge before painting.) If you’re concerned about any design turning yellow, you could always use an acrylic spray sealer at the end. I have a decoupage tissue box I made years ago that still looks the same as the day I made it. No yellowing at all. I hope this helps!
Thank you!
You’re welcome!