How to Decoupage Wooden Spoons the Easy Way
You’ve probably seen ombre wooden spoons all over Pinterest. Well, I’m putting a twist on the trend with decoupage wooden spoons (the easy way)! You should definitely try this at home, kids!

This post contains affiliate links, and I will be compensated if you make a purchase after clicking on my links. For more information, please see my disclosures.
The Pin That Inspired Decoupage Spoons
Originally, I had planned to make a lovely set of painted bamboo spoons like this pin, but since I’m such a decoupage fanatic, I thought I’d experiment with paper-covered utensils! Why not, right?
If you haven’t done a ton of decoupage with scrapbook paper, have no fear! I have a complete guide for how to decoupage on wood to get you started. Trust me, this craft couldn’t get any easier or more affordable!
If you’re new to decoupage, you can also visit my complete guide to decoupage, which has plenty of beginner projects.
How to Decoupage Wooden Spoons
You can watch this video to see a quick tutorial with plenty of helpful tips as you get started.
Supplies
- Bamboo Wooden Utensils
- Scrapbook paper, decoupage paper or pretty napkins
- Mod Podge or other decoupage glue
- Paint brush or foam brush
- Sealer: either clear acrylic sealer (for decorative use only) or dishwasher-safe Mod Podge
Shop for supplies
I suggest buying a paper pad with coordinating patterns if you plan on making a complete set of kitchen utensils.

I highly recommend this set of utensils to decoupage. The price is right, too!
Step 1: Prepare paper or napkins
First, trace the handle of each utensil onto the back of your scrapbook paper. Don’t forget to trace the hole in the handle, too.

If you plan to cook with these items, make sure you leave a gap between the paper and the usable part of the spoon or spatula. Otherwise, you might have the soup du jour staining your pretty decoupage wooden spoons.
Using a standard hole punch, make a hole in the paper to match the handle. You can use a pencil or dowel to increase the size of the opening if necessary.
Step 2: Apply decoupage glue
Next, apply a thin coat of Mod Podge to the handle where you plan to adhere the paper.

Gently smooth the paper onto the handle, making sure you remove any bubbles or gaps.

Then, apply 3-4 coats of Mod Podge to each side of the utensil, waiting 15-20 minutes between coats. I used wax paper underneath to protect my work surface.

Step 3: Apply sealer or varnish
After both sides of the decoupage spoons have dried, apply a sealer. Be sure to wrap the ends of your spoons or spatulas in foil before you spray the handles.

I used acrylic sealer for this project because I plan to use these only for decoration.
You can also use Dishwasher Safe Mod Podge to waterproof your spoons, but I still recommend hand washing your utensils.
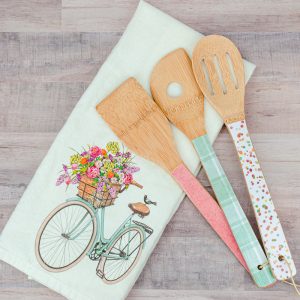
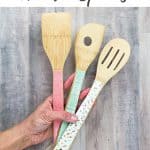
Finished Decoupage Wooden Spoons
I love how the finished product looks, and I plan to experiment more with other designs this spring and summer.

I hope you’ll enjoy creating decoupage spoons to coordinate with your kitchen decor or as gifts for Mother’s Day, birthdays or bridal showers. This is one DIY gift anyone would appreciate.
Related post: Quick & Easy DIY Gifts
If you’re looking for another great kitchen-related gift, check out my post on how to repurpose old picture frames with decoupage. It shows you how to make a nifty recipe cardholder.

Now that you know how to decoupage spoons, what color scheme do you plan to use? Tell me about it in the comments below. I love hearing from you!
Pin it for later!

How to Make Decoupage Wooden Spoons
Equipment
Instructions
- Trace the handle of each utensil onto the back of your scrapbook paper. Don’t forget to trace the hole in the handle, too.
- Using a standard hole punch, make a hole in the paper to match the handle.
- Apply a thin coat of Mod Podge to the handle where you plan to adhere the paper.
- Gently smooth the paper onto the handle, making sure you remove any bubbles or gaps.
- Apply 3-4 coats of Mod Podge to each side of the utensil, waiting 15-20 minutes between coats.
- After both sides of the decoupage spoons have dried, apply a sealer. Be sure to wrap the ends of your spoons or spatulas in foil before you spray the handles. Seal each side with 2-3 coats, waiting 10 minutes between coats.
Notes
Join the Pinterest Challenge
Now, let’s see what other things Pinterest inspired! Head over and visit the other hosts to see what they crafted, cooked, built, or tried!

Erlene – My Pinterventures • Jenny – Cookies Coffee and Crafts •
Debbee – Debbee’s Buzz • Bri – Halfpint Design • Julie – Sum of their Stories
T’onna – Sew Crafty Crochet • Beverly – Across the Boulevard • Debra – Shoppe No. 5
Roseann – This Autoimmune Life •
Leslie – Once Upon a Time & Happily Ever After • Kelley – Simply Inspired Meals
Lydia – Lydia’s Flexitarian Kitchen • Joanne – Our Unschooling Journey
Kristie – Teadoddles • Gail – Purple Hues and Me • Ashley – Emory Farm
Kristie – Love My Little Cottage • Crissy – First Day of Home
Habiba – Craftify My Love • Marie – The Inspiration Vault • Emily – Domestic Deadline
Lauren – Mom Home Guide • Maria – Simple Nature Decor
Alexandra – Eye Love Knots • Lynne – My Family Thyme • Terri – Our Good Life
Marci – Stone Cottage Adventures • Susan – SuzerSpace
Kim – Kimspired DIY • Pili – My Sweet Things
Kelli – K’s Olympic Nest • Erin – The DIY Nuts • Shirley – Intelligent Domestications


I love this idea, and I plan on decorating some spoons I will use for everyday cooking. Will the dishwasher-safe Mod Podge really hold up to everyday use of the spoons? I plan on hand-washing them anyways, just curious to know if anyone has tried it personally.
Hi Esther! Yes, dishwasher-safe Mod Podge should hold up to handwashing. Just make sure you apply several coats and wait a full 28 days for the spoons to cure. As with any glue, I would make sure you don’t place the Mod Podge near surfaces that you will use for food. So, for example, if you were to use it on a glass plate, I would apply it to the back of the plate, not the front. With the spoons, I would only apply the dishwasher-safe Mod Podge to the handle, not the serving end. It’s also a good idea not to let the spoons soak in water. I hope this helps! -Crissy
I love these! How cute I like that you used scrapbook paper for the patterns. Sharing! Thank you for sharing on Merry Monday! We hope you will join us again next week!
Kim
Hi Kim! Thanks for stopping by, and I appreciate you sharing! I love how easy these are to make, and one set of 6 utensils can easily make two sets of gifts.
Gee these are cute. I can’t think of anyone who wouldn’t appreciate a set as a gift.
Thanks so much, Lydia! I hope people appreciate these because I definitely plan on giving some away!
Chrissy, what a cute lottle DIY! I have done wood burning on kitchen spoons before but yours look so much fresher and springspired, lol. I already pinned it to two of my pin boards. Thank you for this great Inspiration!
Thanks, Habiba! I loved seeing your post as well, and I really appreciate you pinning! I’m glad you were springspired! 😉
I absolutely love this and think these would make great wedding and housewarming gifts. Pinning for later.
Thanks, Sonya! I appreciate you pinning and sharing. Yes, I’m planning to have some of these on hands for gifts throughout the year.
These are so pretty and would make a great hostess gift this spring.
Thanks, Emily! I love that you can customize this and coordinate with tea towels or other kitchen items. Have fun with it!
Really nice result and looks sooo easy and affordable to do ! Will certainly give a try soon ! Keep you posted !
Thanks so much! Yes, it’s so easy to do and gives a lot of bang for the buck. Enjoy, and yes…keep me posted!
Crissy, these spoons are so pretty and are perfect for adding a touch of spring to the kitchen! Pinned!
Thank you, Lynne! I cannot WAIT for spring to get here. Maybe that’s why I’m already on the spring craft kick! 😉
What a pretty way to dress up plain ol’ wooden utensils! I love the spring colors you chose! -Marci @ Stone Cottage Adventures
Hi Marci! Thank you so much. I’m glad you liked them. 🙂
Oh my goodness, Crissy! These are so pretty. I love the designs you chose for your decoupage. Absolutely perfect for a kitchen display. Thanks so much for sharing at Project Inspire{d} and in case we’ve never “met”, It’s a pleasure to meet you and I look forward to seeing more of your amazing creativity!
Aww, that is the sweetest compliment, Mary Beth! Thanks so much for your kind words! It’s a pleasure to meet you, too. I love participating in your party each week. 🙂
These are the perfect spring craft! I love how you decoupaged them, I’ve never thought of doing that! Visiting from Homestyle Gatherings 🙂
Thanks, Tiffany! I’m so glad you hopped over. I’m a fan of your blog! 🙂
Super cute idea. These spoon and tea towel is the perfect shower gift. Adorable.
Thanks, Leanna! Yes, pairing it with a tea towel makes the perfect gift. If you saw my stories on Instagram recently, I also found a boat load of cute household stuff at Target that matched my spoons perfectly! Destiny!
Such a fun and easy project. Pinned. How has it held up after washing several times?
Thank you, Erlene! I’m planning to use these more as salad spoons and “light duty” spoons for now. If you want them to hold up after hand washing, I recommend using Dishwasher Safe Mod Podge. The instructions on that product say, “Be sure to keep this gloss away from food and your mouth.” So I would just use Dishwasher Safe sealer on the handle or decoupaged parts only. Hope that helps!
These sure are cute!! I love the colours in the paper that you chose! These sure would make lovely gifts.
Thank you so much for sharing your fun project with us over at Waste Not Wednesday!
Aw, thank you, Sam! I had a blast making these. I’m always happy to join your party, and I appreciate you stopping by!
Great project! These would even be super cute as a shower present and you could add the new couple’s name!
Thank you, Erin! Yes, there are so many ways to personalize! I love your idea of adding the new couple’s name! Thanks for the suggestion.
I love to decoupage just about anything and this is such a lovely way to decorate wooden utensils! Thanks for the inspiration!
I’m glad I could inspire you, Gail. That means I’m doing my job! Thank you for your inspiration, too. I loved being part of this challenge with you.
Oh, I can think of so many reasons to make these for gifts! Mod Podge is my favorite crafting too because there is so much you can do with it. Your spoons turned out really pretty.
Thanks so much, Shirley! Isn’t Mod Podge the greatest? I love crafting with it and trying new things. Thanks for stopping by!
Okay… these just make me sigh with spring fever! So, so lovely, Crissy! (I already bought my spoons!) Thanks for sharing on Homestyle Gathering!
Hooray! I’m so glad you liked them, Julie. Thank you for being such a sweet and supportive friend. I’m happy to link up!
Thanks for the inspiration! These spoons would great gifts!
Thanks, Lauren! I love homemade gifts, and I hope someone will enjoy using these wooden spoons as much as I enjoyed making them.
These are so pretty! I can imagine anyone who received these as a gift would be thrilled!
Thanks, Roseann! I haven’t gifted them yet, but I’m excited to make some as a gift for Mother’s Day later this year. Thanks for stopping by!
These are adorable Crissy! I use to hand paint wooden spoons to hang as decor in kitchens for extra spending money when I was a kid, back when mushrooms were the thing. This took me back! Pinned.
Thank you, Debbee! I’ve thought about hand painting, too. In fact, I have some spoons left over, so I’m thinking I might try that!
Crissy, I’m so glad to know how to make these adorable spoons. Great for gifts! Pinning!
Thanks, Michelle! I’m sure you could come up with some beautiful ones! Thanks for pinning!
I love how you can customize these to fit your kitchen and decorating style. Thanks for sharing such a great idea!
Thanks, Kelley! Yes, I’m always a fan of projects that you can customize, since everyone has a different style. Thanks for stopping by!
Your spoons look terrific! Those would be great as gifts too. Pinning!
Thank you, Pili! I hope to give them as gifts this spring. 🙂
Those are so pretty! What a fun twist on painted wooden spoons; the designs add so much more interest. Pinned.
Thanks so much! I do like having the ability to customize with pretty paper. Thanks for pinning!
Those sure are cute.
Thanks, Kristie. I appreciate you stopping by!
Perfect idea if you want to add some color to your kitchen or even to gift someone. Great tutorial. Pinned.
Thanks, Kelli! I love having this in my back pocket as a gift idea.
What a sweet gift idea, Crissy! The spoons are delicate & adorable. With an endless array of scrapbooking paper designs available, my decoupage brush awaits! Thanks for the inspiration.
Thanks, NC! I hope you’ll enjoy making your own creations. Happy to pin-spire you! 😉
I’m in love with these spoons and I love any excuse to use pretty paper. These are gorgeous & so easy to make. I might have to make these for my kitchen.
Hi Jenny. I hope you do make them! Yes, I can’t turn down a good scrapbook paper deal. It’s like the paper calls my name. Ha!
These spoons are so pretty and ready for Spring!
Thanks, T’onna! All I need is for spring to come! I can’t wait to see what you’ve got cookin’ up, too. 😉
Ooo, these are so pretty, what a lovely house warming gift idea.
Thanks, Julie! They are so easy to make and customize!