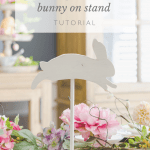
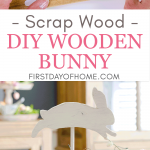
How to Make an Easy DIY Wooden Bunny from Scrap Wood
This DIY wooden bunny is a great way to use any scrap wood you might have lying around. With Easter quickly approaching, I couldn’t resist one last DIY decor project! You need a few basic woodworking tools for this project, but my free design also works well with Cricut, laser cutters, and old-fashioned paper cutting by hand.

This post contains affiliate links, and I will be compensated if you make a purchase after clicking on my links. For more information, please see my disclosures.
Why Make a DIY Bunny on a Stand?
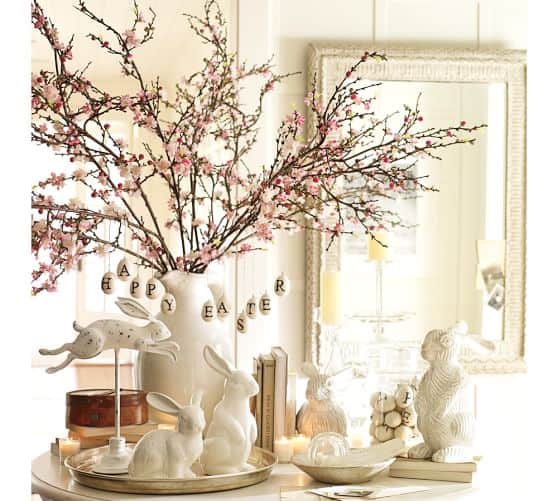
I’m so glad you asked! My inspiration came from an old Pottery Barn tablescape I saw online (see below).
While that whitewashed bunny was a plump 3-D shape, I knew I could make a flatter version in a rustic, farmhouse style.
We first experimented with the farmhouse style when we made DIY farmhouse headboards for our little boys. I’m hoping to do more woodworking projects with my hubby since I’ve discovered how fun it is! All I need now is a lady cave.
The best part about this bunny craft is that you can repurpose it for future holidays. Simply pop off the bunny topper and swap out a festive cut-out for holidays like the 4th of July, Halloween, and Christmas.
My fabric Christmas trees are a great example of what that would look like.
Wooden Bunny Supplies
I used scraps of cedar for this project and a few other woodworking and paint supplies. You can also use pine or plywood, which is readily available at home improvement stores.

Here’s what you’ll need to get started with this Easter bunny craft:
- Bunny pattern — You can download my pattern in SVG or PNG format
- Scrap wood for base: 11 x 3.5 inches (30 cm x 9 cm)
- Scrap wood for bunny: 10 x 6 inches (25 cm x 15 cm)
- Wooden dowel
- Chalk paint and brushes
- Scroll saw (or coping saw) and drill
- Sandpaper
- Optional: Hot glue gun or wood glue
This project could cost as little as $5-10 depending on the supplies and equipment you already have. Big bang for the buck, if you ask me!
Note: Another option is to decoupage your wooden bunny instead of painting it. I have a full tutorial on how to decoupage on wood, if you decide to go that route.
How to Make a Wooden Bunny on a Stand
This is a super-easy project for beginner woodworkers. The hardest part is finding the image you want to cut, which I’ve already done for you. You can easily make the entire piece in a few hours, from start to finish.
Step 1: Download and print/cut the bunny templates
I’ve provided bunny patterns you can download in SVG or PNG format to use with a cutting machine or to cut the design by hand.
Option 1 (SVG) – Cut the shape with a cutting machine
I used the SVG file with my Silhouette Cameo* to cut the shape onto cardstock paper. You can also use SVG files with a Cricut Maker 3 or Cricut Explore 3 cutting machine.

*You will need Designer Edition or Business Edition versions of the Silhouette Studio software to use SVG files.
Option 2 (PNG) – Cut the shape by hand
If you don’t own a Cameo or
You’ll want to resize the image in a word processing or photo editing program to fit the dimensions of your wood. (I sometimes use Word or PowerPoint.) Then, simply print and cut the shape with scissors.
Step 2: Trace or tape the pattern onto the wood
Before applying your pattern to the wood, you may need to smooth the surface using sandpaper.
One side of my scrap wood was rougher than the other. I physically taped my Easter bunny pattern to the roughest side so that the smoother side could glide evenly across the scroll saw.

Step 3: Use a scroll saw or coping saw to cut the bunny pattern out
If you plan to use a scroll saw, you may need to make several “relief cuts” with straight lines perpendicular to the curves.
This allows you to gradually work your way around the curves of the bunny. If you try moving the wood backward or to the side, sometimes you risk breaking the blade. (I speak from experience!)
I used a scroll saw that belonged to my husband’s late mom. If you’re new to woodworking, you’ll see many options for affordable scroll saws, like this one.
I recommend getting this book to learn about the countless projects you could do with a scroll saw! I get excited thinking about it.
If you don’t have the space or budget for a scroll saw, you can always cut your wood by hand using a coping saw. These are super cheap! I plan to use one for future projects and will report back on how it goes.
Step 4: Drill holes and cut the dowel to size
After cutting your wooden bunny silhouette, you’ll want to drill a hole in both your base and the underside of the bunny. Make sure your drill bit roughly matches the size of your wooden dowel. Ours was about 3/8 inch (1 cm).
Finally, cut your dowel down to size until you’re satisfied with the height of your wooden bunny.

My final bunny measured 13 inches (33 cm) from the bottom of the base to the top of the bunny’s ears. I think it looks so pretty even without any makeup on!
Step 5: Paint bunny, dowel, and base as desired
I chose cream chalk paint for my bunny stand. When I applied the paint, I used rough strokes to leave some of the natural wood exposed.
I really dig the rustic effect I got with this method. Now that I look at it, I might go back and sand the edges even more for a farmhouse spring look.

Step 6: Apply wood glue (optional)
If you’d like to stabilize your DIY wooden bunny, add a dab of wood glue on the tip of the dowel before placing it on the stand.
I didn’t use any wood glue or hot glue with my wooden bunny since I like having the option to swap out the figurine for various holidays.
Displaying Your DIY Rustic Wooden Bunny
You can take your little bunny anywhere and add him to your Easter decorations! I love how lightweight and portable this little fella is.
I took a few photos of him on my Easter tablescape, but I might let him roam my kitchen and living room, too. I may also play with adding some farmhouse ribbon or a bunny face with whiskers to dress him up.

Before you go, be sure to check out my full Easter table decor and DIY painted bottles which are perfect for spring. I also have a tutorial for decoupage Easter eggs that would go well with this wooden bunny.
Hopefully, you’ll be inspired to try a project like this at home, especially if you have some scrap wood and basic woodworking tools. I can’t wait to get started on my next holiday topper for this stand!
Any ideas? Send them my way!
Pin it for later!